Field type: relational
The relational field allows you to build relationships between other sets of data inside GraceBlocks. For example, if you track candidates on one tab and the talent pipelines for how you want to organize the candidates on another tab, you can use the relational field to assign candidates to one or more talent pipelines. This concept allows support for database relationships inside your Blocks. To build a connection between tabs, a builder chooses the relational field type when managing fields.
You can view the available properties for short text fields on the Edit field properties modal when you select Field type of Relational.
Properties of Relational fields
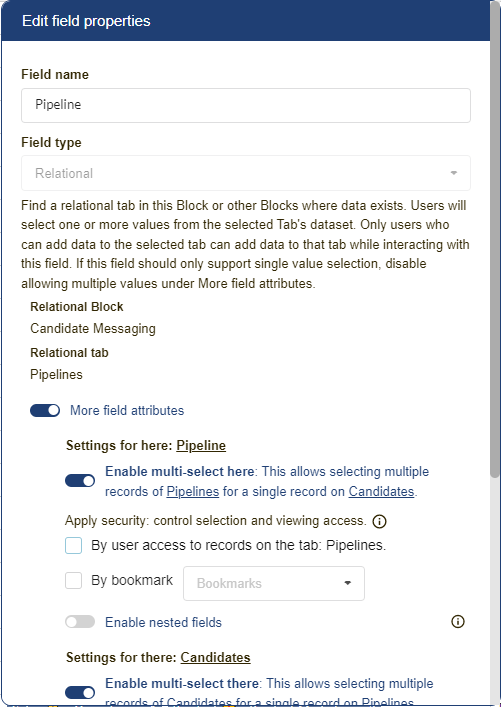
After you specify a Field name (which controls how this field is referenced inside the tab) and that the Field type is Relational, the screen updates to display the attributes you must define and More field attributes that you can select, which are outlined below. Complete the transaction at the end by clicking Save.
| Property | Description | ||||
| Relational Block |
This is the Block where the tab exists for which you'd like to establish the relationship. If you are working inside a Zone on the free plan, only the current Block is available. However, paid plans allow you to establish relationships with any Block inside the Zone. |
||||
| Relational tab | When you have a Block selected, you can see a list of tabs that are inside that Block. Select the tab that contains the related data you want to work with. | ||||
| Private field | Use this setting if only authorized users should be able to access this field. If this is applied, the field will be locked out from the user's view entirely unless they are authorized to access private fields. This setting works in conjunction with the security access control tab setting: View private fields. If a field is private, only users authorized to view private fields will be able to view, edit, see history, filter, or download this data. Click here to learn more. | ||||
|
Settings for here: Enable Multi-select here |
If you'd like to be able to select multiple values, leave this option enabled. (It is enabled by default.) If you want to limit users to a single value selection, disable the multi-select option by toggling this option into the off position. In our example, a candidate can belong to multiple pipelines, so the multi-select option remains on. If a candidate should only ever only belong to one pipeline, this option would be disabled. |
||||
|
Settings for here: Apply security: control selection and viewing access. By user access to records on the tab: [there] tab. (This capability can only be leveraged when on a paid plan. Attempted use on free plans will prompt the user that an upgrade is required.) |
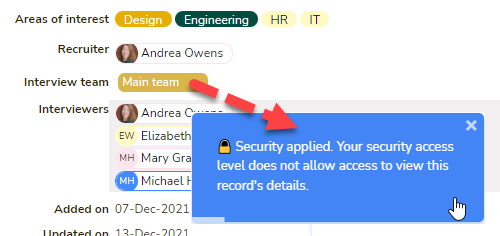
If you have set security access levels so that not all users can view all records on the Tab this field is related to, check this option to hide the field and any data the field may otherwise expose to users without full access to the tab. If the field is unchecked (the default behavior), the data is visible and users can select and interact with all options without restriction. If you leave this field unchecked, if a user is not authorized to view the details of a related record, the user will see a message indicating this when they try to drill into the related record's detailed information. Example: Let's say that you have a tab where you define job requisitions, and then can associate requisitions with candidates by using a relational field on the candidate's tab that connects to the requisitions tab. Scenario 1: Perhaps there is sensitive requisition information, and you do not want to display anything about requisitions unless a general user is a collaborator on the requisition. The tab security level access settings are set that define this. The builder, when configuring the requisitions field on the candidate's tab, can check this apply security: control selection and viewing access. This does the following for General users on the candidates tab:
Scenario 2: The information is useful and necessary. Leaving the box unchecked would allow the general user in this scenario to view all possible requisitions while on the candidate's tab. The column will not hide as in scenario 1, and filtering by the options is possible. However, if the user attempts to "drill" into viewing a requisition's details they are not authorized to view, the user would see a message informing them they can not access the details. Learn more: security access levels control.
The table below summarizes the behavior for this setting:
|
||||
|
Settings for here: Apply security: control selection and viewing access. By bookmark (This capability can only be leveraged when on a paid plan. Attempted use on free plans will prompt the user that an upgrade is required.) |
This setting applies to the list of values a user can choose from when interacting with a relational field. For example, let's say you are working with a list of job requisitions and you want to be able to match candidates to these requisitions. However, when selecting from the list of requisitions, you only want users to select from the list of "open" requisitions. Use this feature to make this possible by completing the following steps.
When users select a job to associate with the candidate, only jobs matching the bookmark's filter will appear for the user to select. 🔔This setting does not impact the values a user sees that are already applied to a record, nor does it impact the options a user can select when filtering records by this field. 🔔 If you also want the list to be filtered to only jobs the user is authorized to work with, use this feature in combination with the setting described just above. Then users will only be able to select jobs in this list that are both open and available according to their role's security access level. Learn more: Block roles and security access levels 🔔 This setting is ignored by records added/updated via API. It is a feature specific to the GraceBlocks user interface experience on web and mobile. |
||||
|
Settings for here: Apply security: control selection and viewing access. Enable nested fields (Nesting capabilities can only be leveraged when on the pro plan. Attempted use on free or basic plans will prompt the user that an upgrade is required.)
|
This option enables the nested selection of values from the relational tab being specified. Learn more about nested fields
|
||||
|
Settings for there: Settings Repeated for the three settings listed above. |
When you create a relational field, you are actually creating two fields: the one where you are currently working and a companion field in the tab you are relating to. These three settings apply the rules you specify for the companion field in the tab this field is related to. |
||||
| Default value |
Provided the value specified exactly matches the value selected for the relational field, a single value default can be defined in text here that will pre-populate (and be editable) with every new record created. |
||||
| Field callout |
If you enter any text into the Field callout textbox, the information (i) icon appears to the left of the field name, and the text you entered displays when users move the cursor over this icon. Enter text here if you want to provide information to help the user learn more about how to use the field. 
|
Important notes
🔔 The Settings for here and Settings for there options require planning. The data you are working with determines how you should configure these options. You need to think carefully about how you want this to work every time you add a relational field to ensure that you choose the right options for that specific business scenario.
🔔It is NOT possible to convert a relational field into another field type later. If the field is no longer needed, you can delete it.
🔔 Once you create a relational field type, editing options for the field are limited; you can change only the following:
- Field name
- Settings for here and Settings for there options
- Default value
- Field callout
🔔 Whether a relational field has the multi-select or single-select attribute enabled has a big impact on how it will display to the user on the details page. Understanding this layout impact can help you choose the best attributes for the data you are working with.
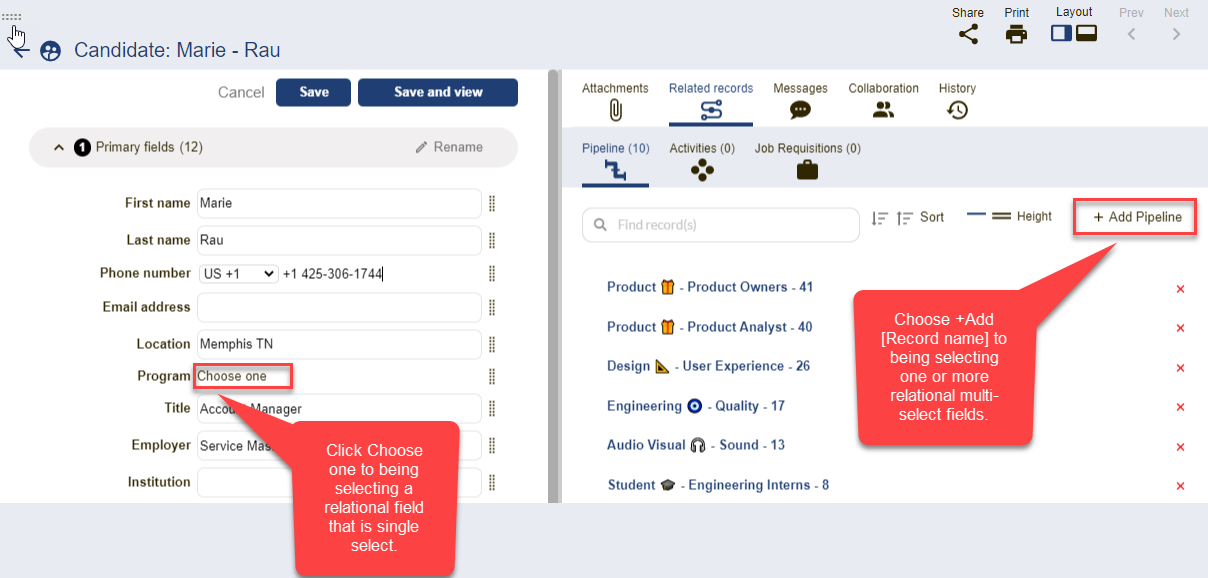
Single-select records are configured into the layout on the left panel, while related records will appear on the right side under Related Records. In either case, you can drill into the related record by clicking on it. The order of the sub-tabs for related records is controlled by the user's current ordering of columns for the tab.

🔔The illustration below outlines how to select and add a relational value from the details page.
🔔 The table below outlines the user experience for selecting relational records. The experience varies based on whether nesting is enabled on the relational field. The summary below outlines the difference.
Nesting Enabled
Search to select or select from the nesting level to be presented records associated with the nested selection. In this example, only one nesting level is configured.
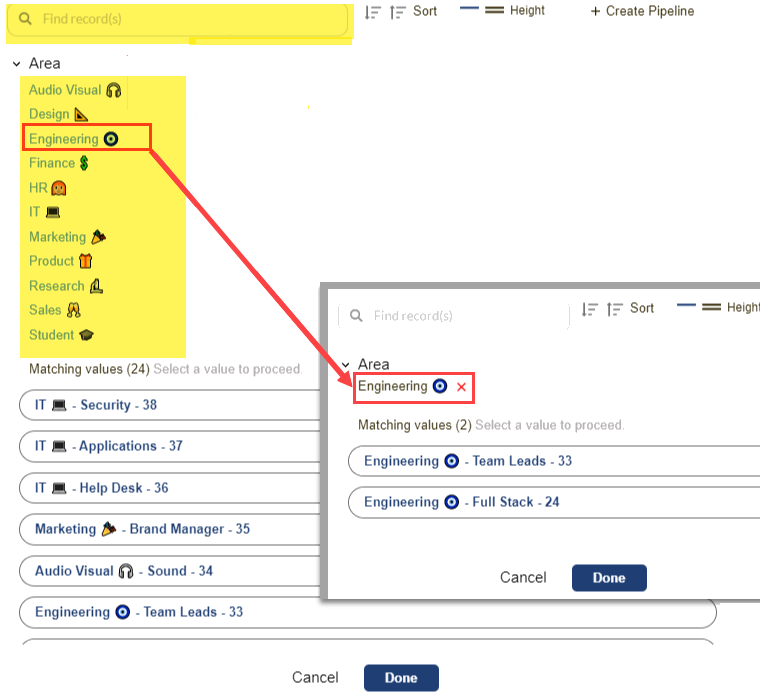
Configuration behind the visual above:
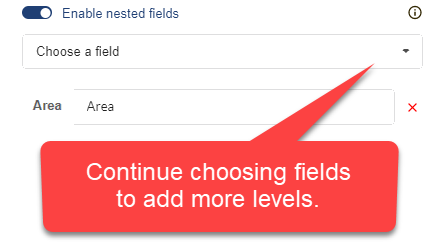
Note: Nesting also impacts the display in Web forms. See more about web forms here.
Nesting Not Enabled
Search and select from a flat list of options.

