Sharing records and living lists via bookmarks
Depending on your role security access level, you may have the ability to share records with non-GraceBlocks users using the Share function. If authorized, you will see the Share icon when you access a tab in GraceBlocks.

This article covers:
- Creating share links
- Example share links
- Understanding the share records panel layout
- Reviewing the share link user experience
- Deactivating and re-activating share links
Creating share links
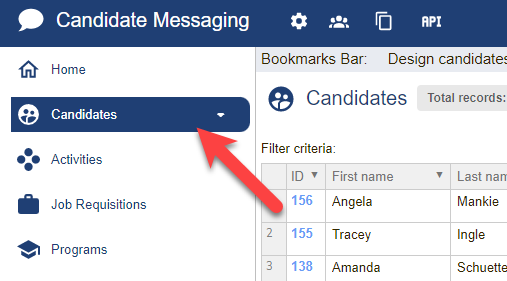
When you click to access a tab in GraceBlocks, if authorized according to your role and security access level for the tab, you can create a share link by following the steps outlined below.
| Step | Action | Visual |
| 1 |
Navigate to the tab with the records you wish to share. The tab's records tab will appear. |
|
| 2 |
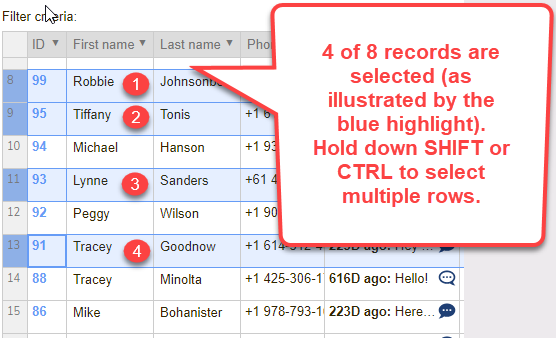
Understand which records you want to share, and take the appropriate action. Either:
or
or
|
or
or
|
| 3 |
Click the Share icon in the navigation bar above the record(s). The share records panel appears. |
|
| 4 |
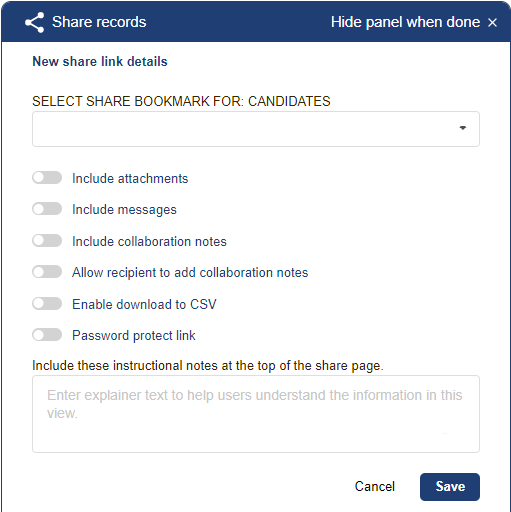
With the first share created for a tab, the new share link settings page appears. Complete the share settings and click Save. 🔔 After the first share is created, choose to Create a new share, then the new share page will. 🔔 Review the table below to understand all of the new share link settings which can appear.
The new share will be created and presented for use on the created share settings page. Reference this overview image as well.
|
 |

Example share links
Click on the share link example provided below to see and explore a live share link. These links will help give you a feeling of how they work. View the links from mobile and desktop devices to review the behavior under both circumstances.
| Example Scenario | Example Link |
| Example 1 (not password protected) | |
|
Example 2 (password protected) (password= GraceBlocks!) |
https://mygraceblocks.page.link/geh5zKt16ERab7K5A |
Understanding the share records panel layout
Review the table below to understand the actions available on the pages within the share panel. Use the overview image and numbers in the illustration to guide your review.
Overview image of the share records panel
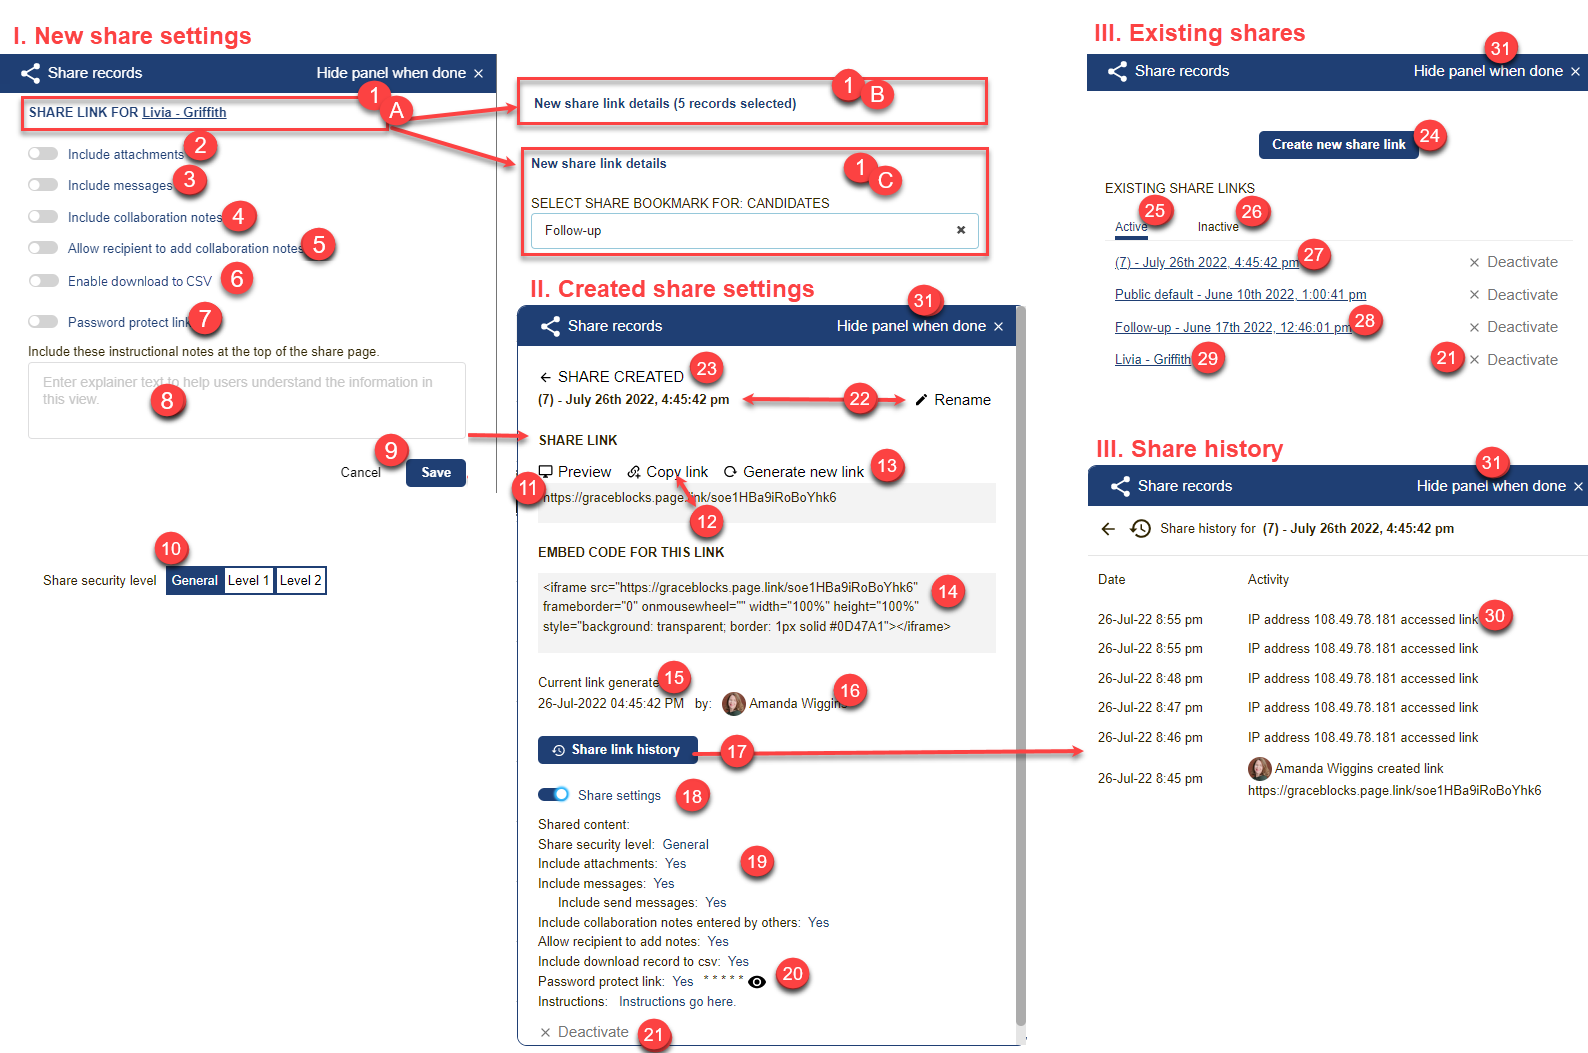
I. New share settings page
When creating a new share, you will specify settings that define how that share will work and what information is being shared.
- Share header: The header will reflect what you are sharing. It will vary depending on what you are sharing.
| Scenario | Details |
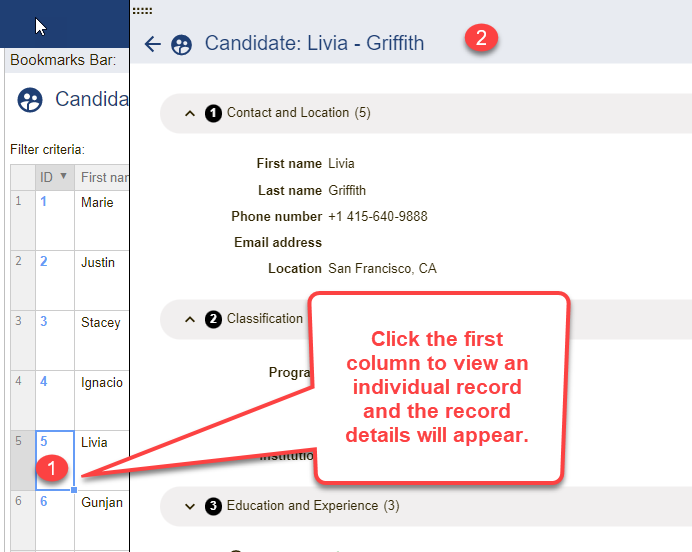
| A - Single record |
If you share a single individual record, that record's record identifier will display in the name. |
| B - Multiple specific records | If you have highlighted specific records to share, the number of records you have selected will display. |
| C - Living list bookmark |
If you've made no explicit selection before starting the share action, the system will prompt you to specify a bookmark to identify the living list of records that will be shared. 🔔 If you do not yet have a bookmark saved, you will need to create one before proceeding with this scenario. |
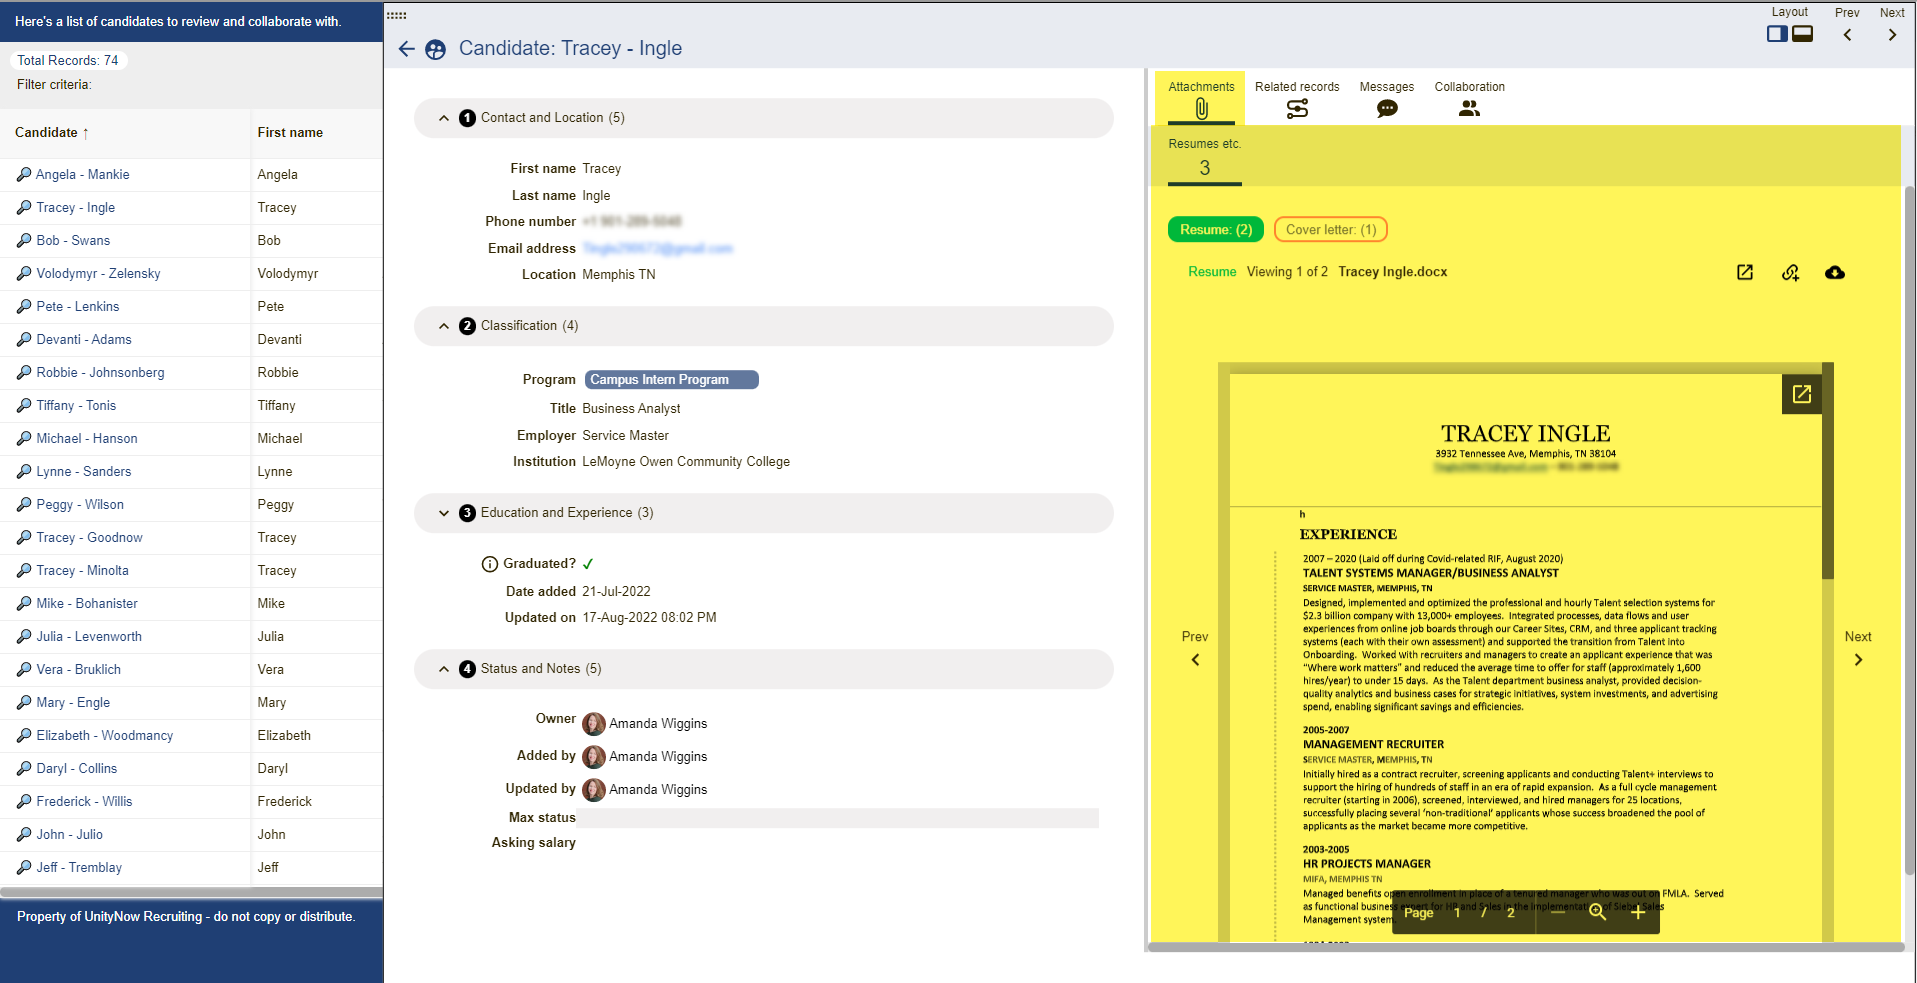
- Include attachments: By default, this is disabled. Also, it will only appear if the attachment field type is included in the tab. Toggle it on if you wish for attachments linked to the record(s) to be included in the share. The visual below highlights in yellow what will be included on each record in the share only when this is enabled.
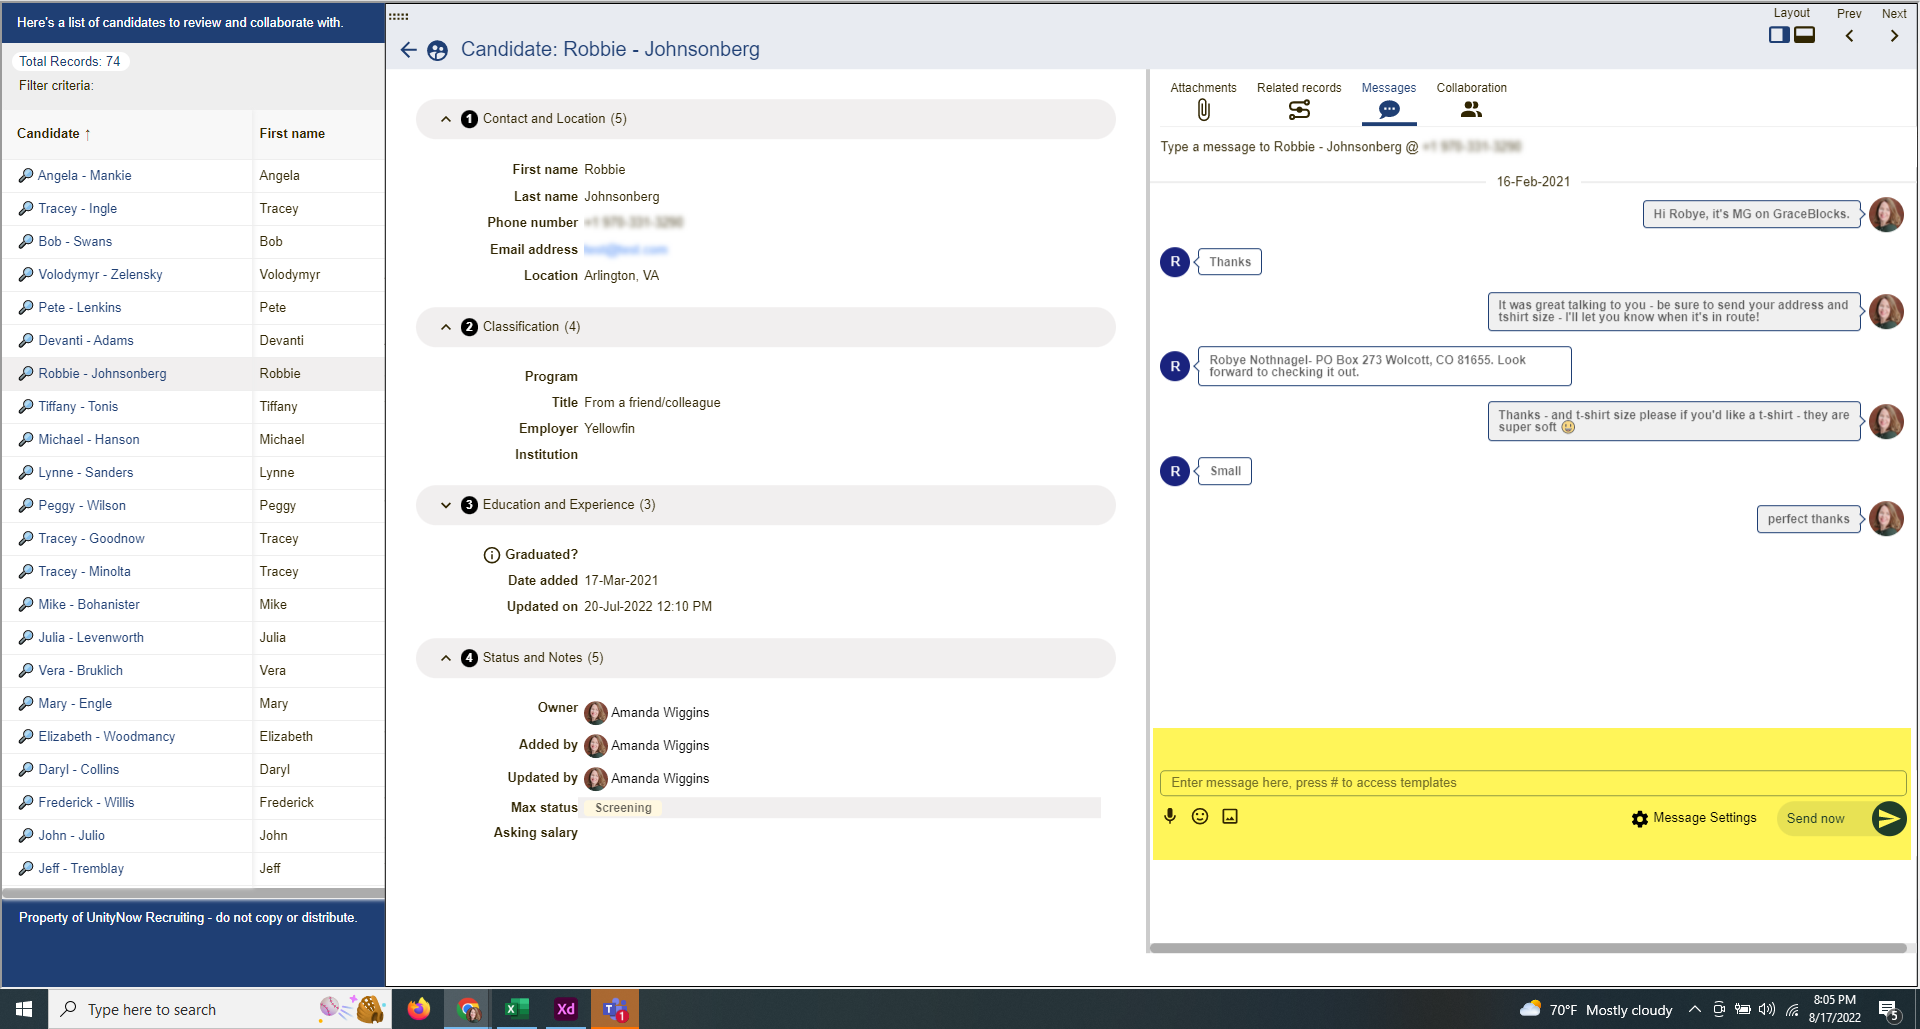
- Include messages: By default, this is disabled. It only appears if the message thread field type is included in the tab. Toggle it on if you wish for the message thread to be included in the share.
The visual below highlights in yellow what will be included on each record in the share only when this is enabled.
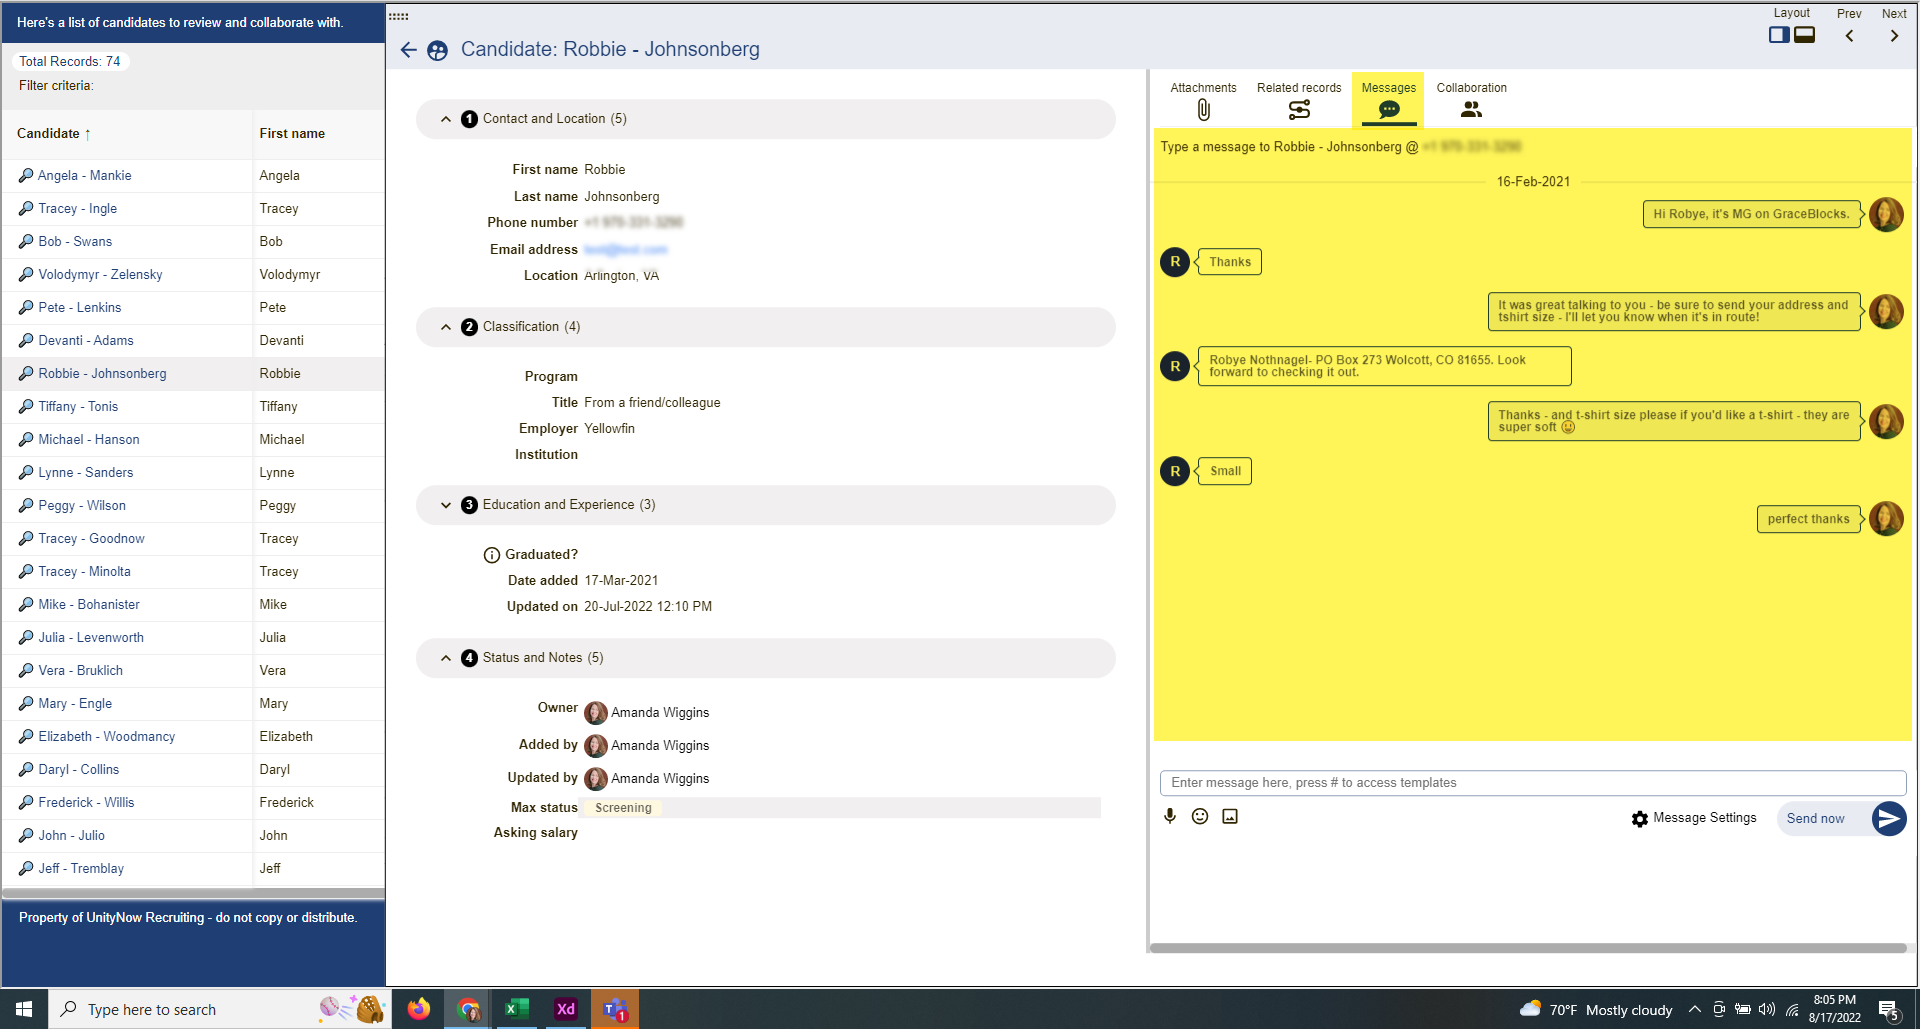
- 🔔 When you toggle on this option, you will also have the option to allow share link recipients to communicate by responding to messages via the share link. Toggle this option on as well if desired. The visual below highlights in yellow what will be included on each record in the share only when this is enabled.
- Include collaboration notes: By default, this is disabled. If you'd like the share recipient(s) to be able to see the collaboration tab and all exchanges among GraceBlocks users, toggle on this option. The visual below highlights in yellow what will be included on each record in the share only when this is enabled.
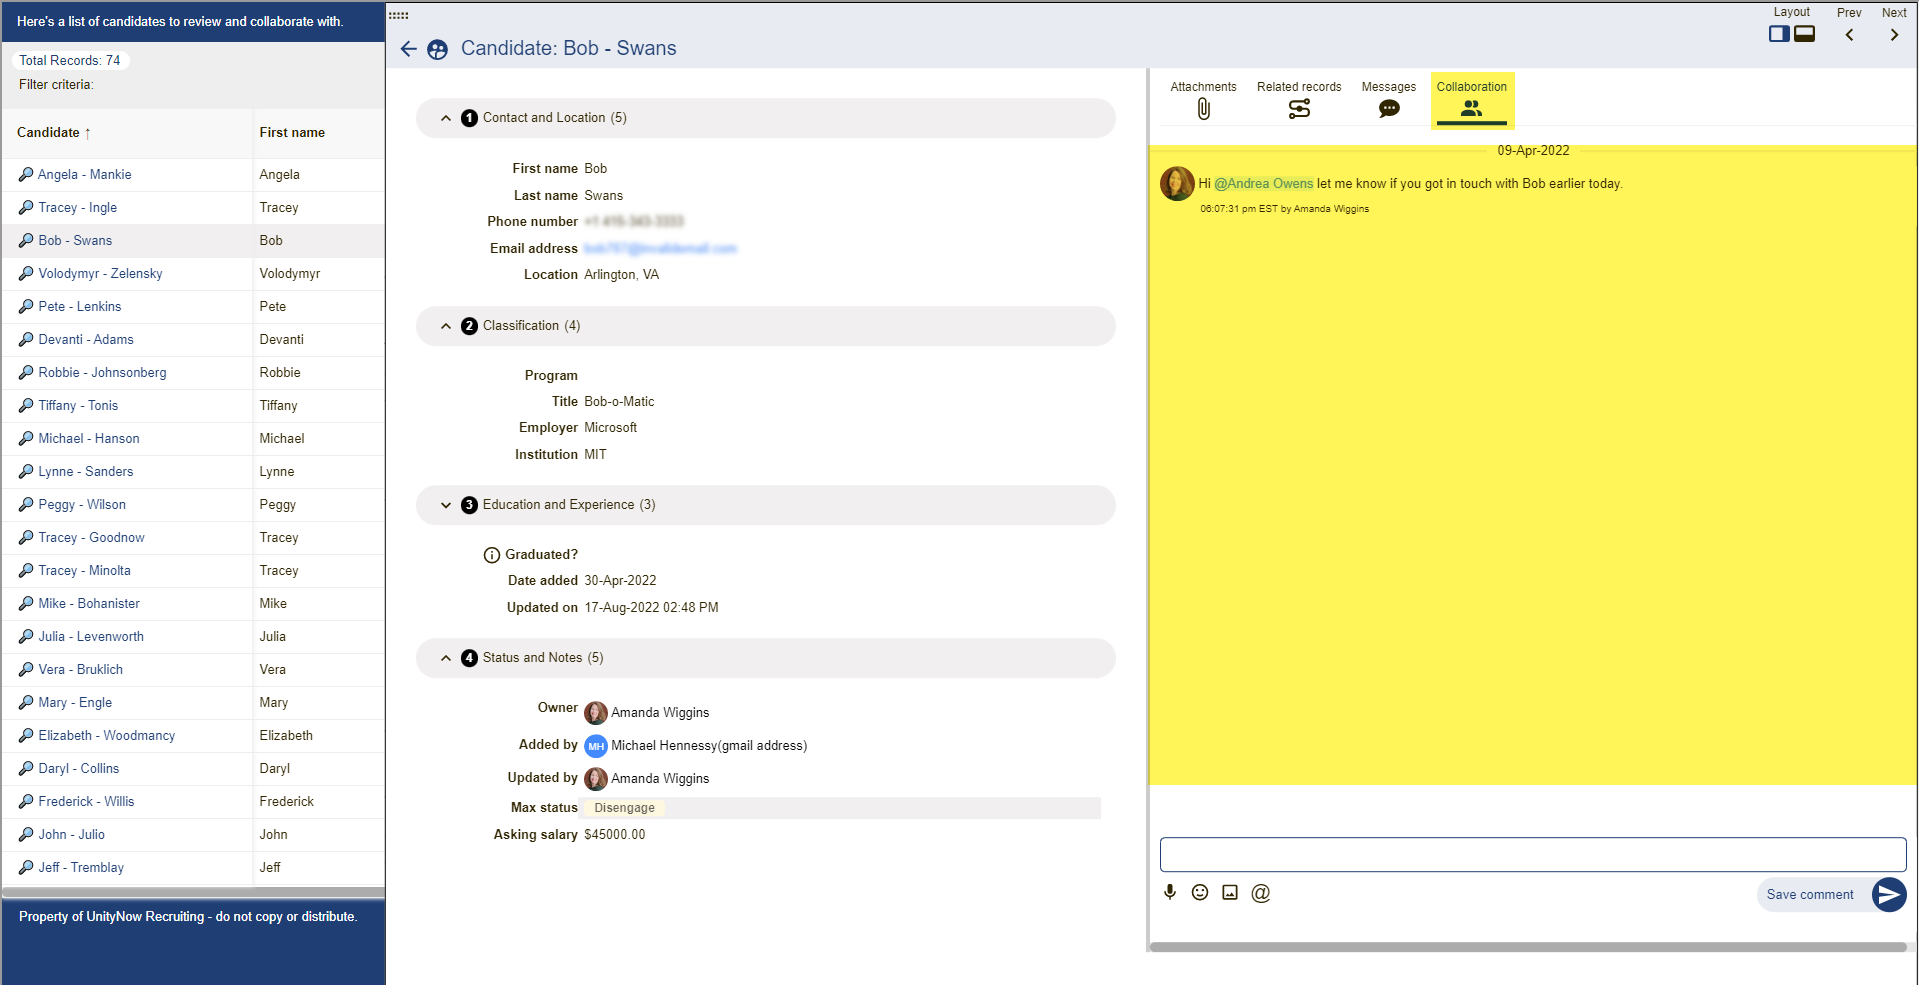
- Allow recipient to add collaboration notes: By default, this is disabled. Even if you choose not to let the share recipient review collaboration notes, you can still allow them to provide commentary by enabling this option. The visual below highlights in yellow what will be included on each record in the share only when this is enabled.

- Enable download to CSV: Provided you are authorized yourself to download to CSV according to your user's role security access level, you will have the ability to include this as an option for share recipients as well. If enabled, provided more than one record is included in the share, a download icon the share recipient can click to download a CSV of the share. The columns included in the share list view will be the same provided in the CSV.
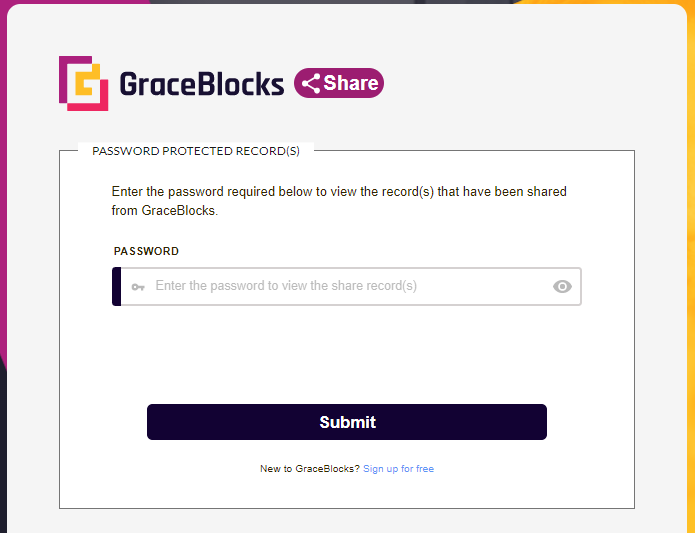
- Password protect link: If you'd like to require the recipient of the link to enter a password to access the records included with the share, toggle this on and then enter the password that share recipients need to enter. The initial page the share recipient will come to on clicking the share link will include a password prompt, illustrated below. Upon entering the correct password, they will be shown the information provided in the share. (💠This feature is only available on paid plans.)
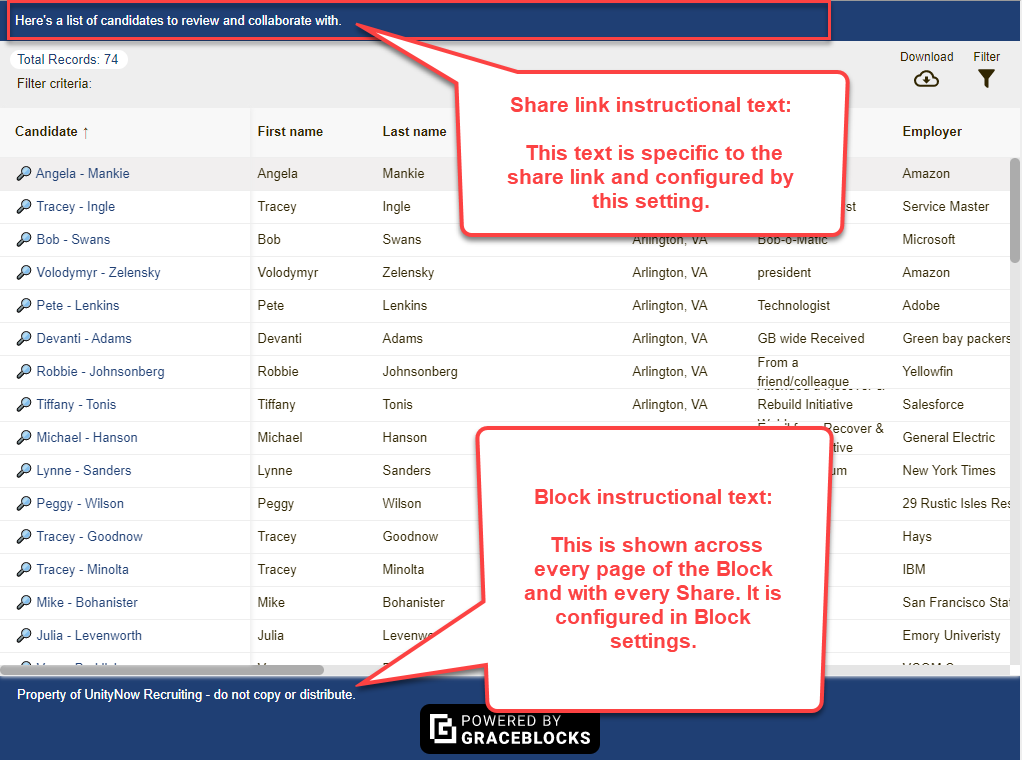
- Instructional notes. If needed, enter comments in the Include these instructional notes at the top of the share page field. This information will appear on the top of the share page to help guide share recipients as they review records, as illustrated below.
- Save and Cancel: Clicking save will save the share and present the user with II - Created share settings information. Clicking cancel will exit the share modal without saving anything.
- Share security level: Like the rest of GraceBlocks, share links are aware of roles and security access levels. If a signed-in user accesses a share link, they will view the data included in the share according to their user account's security access level for the Block and how it's applied for the tab being shared. Everyone else is considered an anonymous user (since they are not signed-in users). Anonymous users will access the share link according to the access level you specify according to that level's rights under tab settings. Users are only authorized to share at a security level equal to or less than their access level. This means level 2 and builders can specify sharing at level 2, level 1, or general. Level 1 can share at level 1 or general. General users will not see the option at all since they can only share at the general level. 🔔If a tab is configured such that general or level 1 users can only view records where they are a collaborator, these users will not be able to easily share with users outside of the system since anonymous users can not be set as collaborators. (💠This feature only applies to paid plans where security levels can be set. Free plan Zones will never see this option when sharing.)
II. Created share settings page
Once a share is created, the user will be given the information to support sharing.
- Preview: Clicking this option will generate the share in a pop-up on the page so you can see what the share will look like for recipients.
- Copy link: Click the link to copy it to your clipboard, or copy and paste the link text. You can then distribute this link to your intended share recipients.
- Generate new link: If you want to disable an existing share link and create a new link to use when sharing, click this option. Any prior recipients of the old link will not be able to access the share using the prior link once this action is taken. Instead, prior link recipients will see a message informing them that the link is not valid.
- Embed code: If you'd like to embed the share information into another webpage, copy the embed code provided and insert it where desired. This is helpful if you want to embed information included from share into an existing website.
- Current link generated: This will reflect the date and time when the most recent share link was generated. (This will be either the original share link date or, if a new link was generated, the date of the most recently generated link.)
- By: The person who generated the most recent version of the share link.
- Share link history: Click this to see the history of the share link. History always starts start with the creation, illustrating who originally created the share and when. It will then chronicle any new link generations and also every instance where the share link is viewed, storing the IP address as well as date/time. See Setting 30 in the overview image above to see a visual of what share history looks like.
- Share settings toggle: Toggle this on to display all of the settings defined when creating the share link. It is not possible to edit these settings. However, you can disable the share if needed and create a new one.
- Share settings: With the toggle for share settings activated, the share settings will display as shown in the illustration above.
- View password: If a password was defined for a share link, obtain the password by clicking the eye icon. This will make the password visible.
- Deactivate: To fully disable the share, click this option. The share link will become inactive, and any user who tries to access it will be informed that the share link is no longer valid.
- Share name/rename: The share name reflected at the top of this page will be included in the browser tab title. By default, the share name will be will either the A) Record name B) Count (if specific records were shared) or C) the bookmark used in creating the share + the date/time that the share was originally created. Click the rename link to rename the share if you would prefer a different name. Click the save icon (
 ) to save any changes.

- Share navigation breadcrumb: Click this to return to your list of shares.
III. Existing shares page and history
Once the first share has been created, when a user clicks to share, they will see the page first and can proceed with the following options.
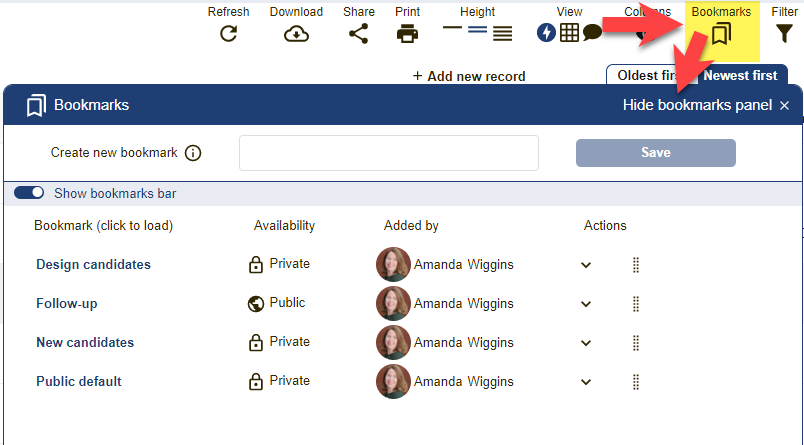
- Create new share link: Click this to create a new share link.
- Active: By default, users will land viewing active share links.
- Inactive: Users can choose to click this link to toggle over to view the inactive shares tab. Here, the details of inactive shares can be viewed. Inactive shares can be reactivated using the re-activate link.
- Share link - created by selecting specific records: This is an example of an existing share link. The name is shown and can be clicked to view the details of the existing share and access functions 11 - 23 listed above. In this case, the share name illustrates the default naming convention that indicates the number of records specifically selected when creating the share link. (Option B from step 2 of the actions for creating a new share.)
- Share link - created using a bookmark: This is an example of an existing share link. The name is shown and can be clicked to view the details of the existing share and access functions 11 - 23 listed above. In this case, the share name illustrates the default naming convention that indicates the bookmark selected when creating the share link. (Option A from step 2 of the actions for creating a new share.)
- Share link - created when viewing a single record: This is an example of an existing share link. The name is shown and can be clicked to view the details of the existing share and access functions 11 - 23 listed above. In this case, the share name illustrates the default naming convention that indicates the share was from an individual record. (Option C from step 2 of the actions for creating a new share.)
- Share link history: This illustrates share link history when accessed from the existing share using share setting item #17 above. This area lists when the link was created or reset, who took these actions, and when. It also lists the IP history of when the link was viewed with date/time.
- Hide panel when done: Click this to close the panel when you are done working in this area.
Reviewing the share link user experience
When viewing a share as a webpage or embedded HTML, users will see a page that illustrates the contents of the record(s) shared. The primary color of the share will match the primary color of the Block where the share was initiated inside GraceBlocks. A password may be required to access the page if the share was designated to be password protected (#6 from the listing above). The illustration below outlines the common elements of the share page. Use the overview image and numbers in the illustration to guide your review.
Overview of the share link user experience
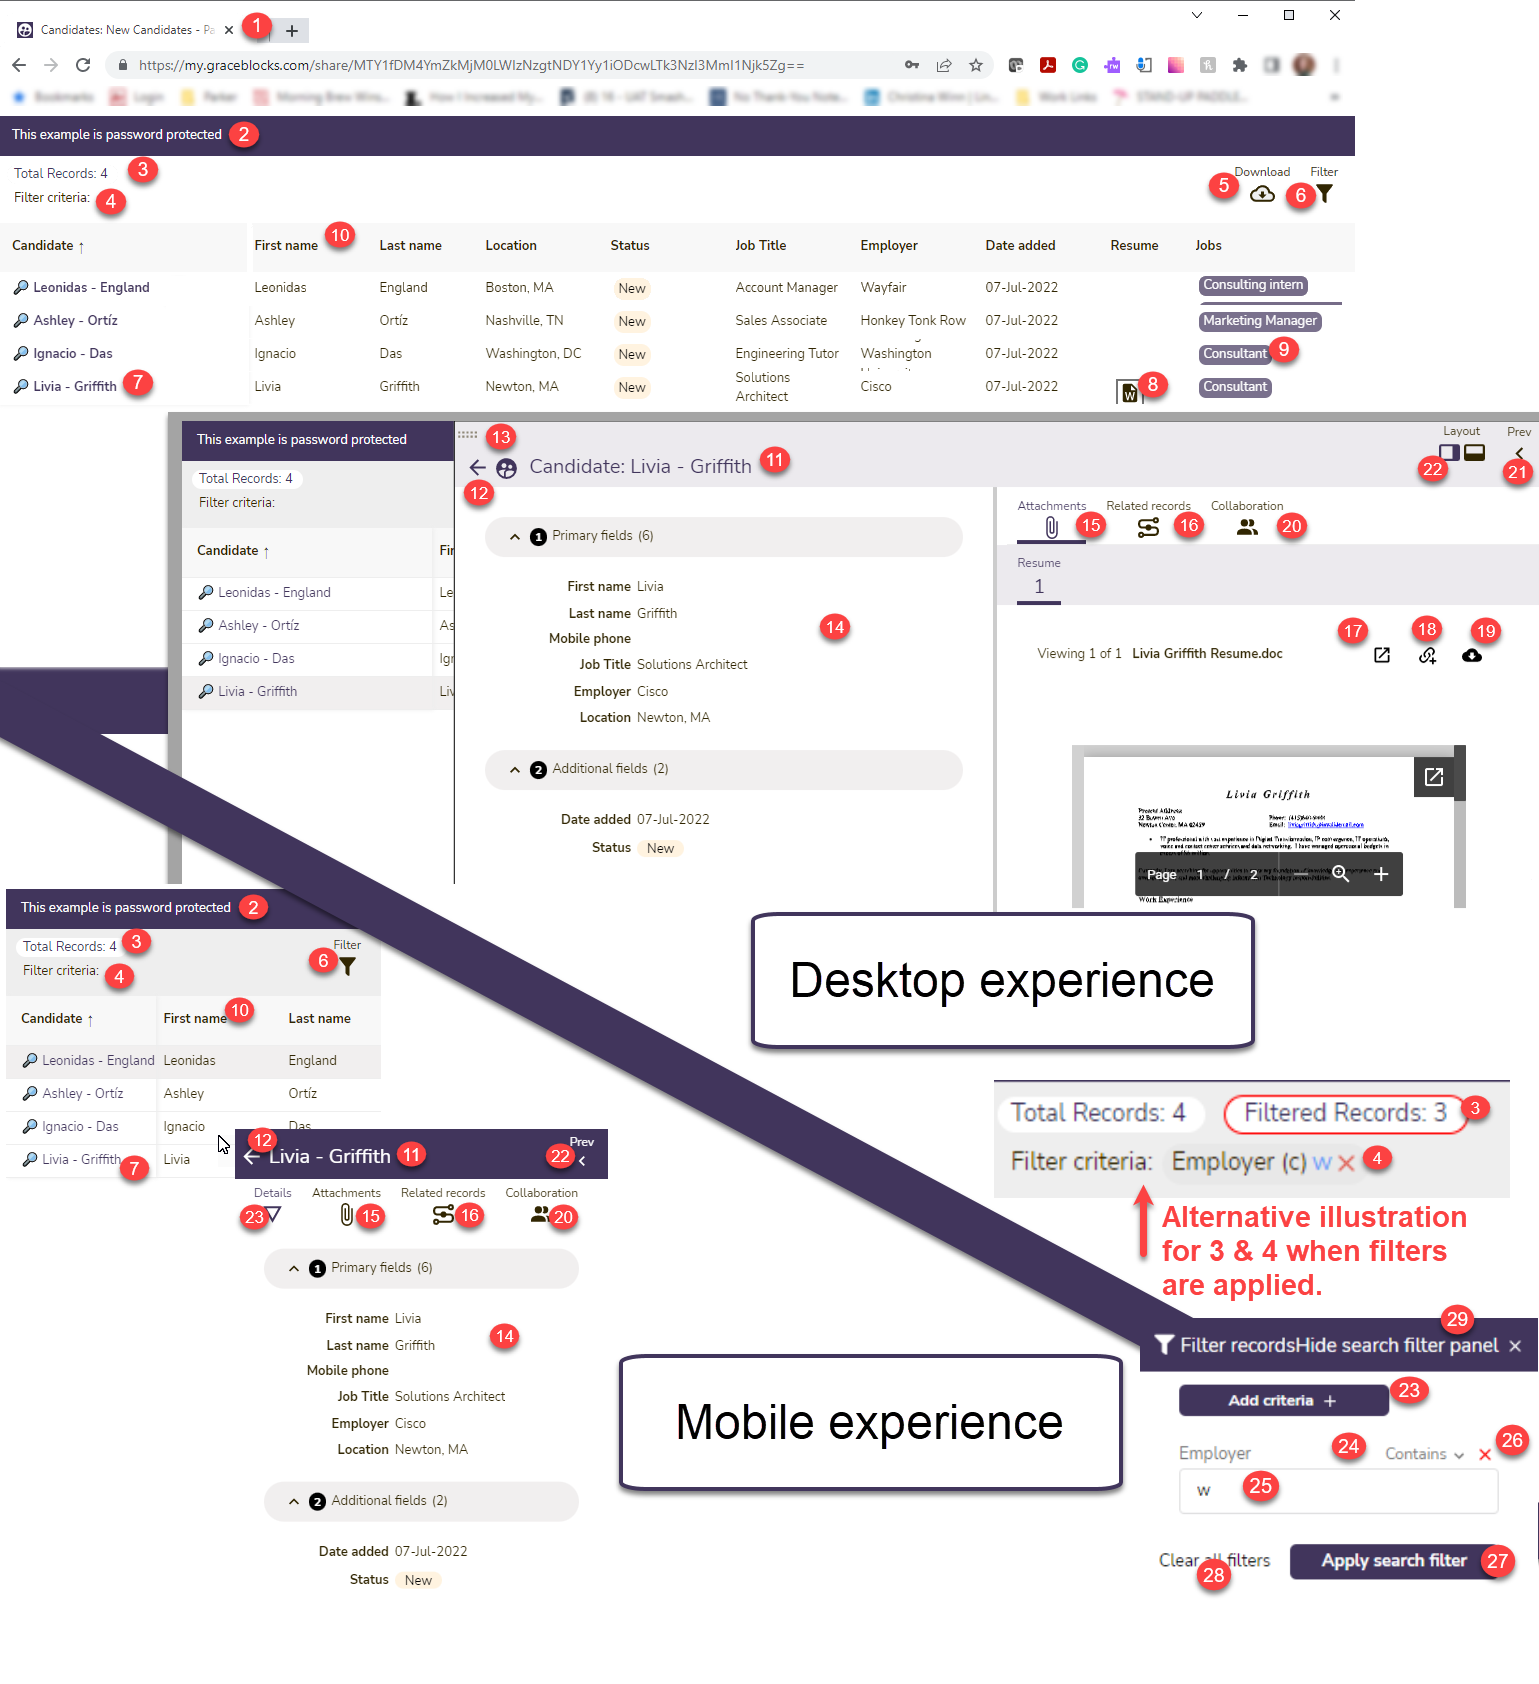
(If a number is not shown on an experience, it does not apply to that experience.)
- Share tab title: The share tab will always include the icon, name of the tab, and name of the share.
- Instructional notes: Any note entered into share setting #5 listed above will appear here.
- Total records: The total records in the share will display here. If filters are applied by the share recipient (using item 6 below), you will see a second bubble counting how many records are included in the filtered results set.
- Filter criteria: If the share recipient has applied filters, the criteria they have used will display here. They will also be able to remove the filters by clicking the red x next to each filter criteria bubble.
- Download: The share recipient can download the share results provided the share recipient enables this option (using setting 6 listed above in share settings). The CSV file will reflect the columns displayed when the download is initiated.
- Filter: The share recipient will have the option to explore the share results using the filter button. Skip to #23 for more information about using the filter panel.
- Record identifier - details link: The first column in the listing is the record identifier as configured by the Block builder. It is how the record is identified in the system. Share recipients can click this link to navigate to the details panel for the record.
- Clickable attachment files: Only if an attachment field is included in the columns shared can it be clicked to access the attachment. For information about including attachments, see setting #2 in the share settings above. The inclusion in the list also is controlled by whether the column is included with the columns for the share (see step #2 of creating a share for more details).
- Related records: Any records that are values from other records in GraceBlocks will be bubbles aligned to the color of the Block. Only snapshots of related information will be visible from the recorded list view. Navigate into the record details for more complete information about related records.
- Columns: Each column illustrated can be resized, similar to resizing a column in excel. Click the top of most column rows to sort (multi-select options can not be sorted). The columns included will reflect the columns included in the shared bookmark. If multiple records were selected for sharing, authorized users who are signed in will see columns according to their own settings for the tab. Otherwise, for anonymous users, the default columns will be used during the share. By default, this is all columns in the order they were created. However, builders can configure a default specification by configuring a public default bookmark.
- Record identifier: This is the primary name of the record configured by the builder when specifying the record identifier in tab settings.
- Back navigation: Use this back arrow to navigate out and close the record details panel. It returns a share recipient back to the list of records.
- Drag icon: Use the drag icon to resize the space allocation in the details panel. You can drag it further to the left or right as desired. The middle column splitting the right and left detail panels can also be dragged to resize the space allocation for each side of the details page while on desktop.
- Record fielded details: All fielded information about the record will display here. This information is never editable from a share. It is always read-only.
- Attachments: If attachments were included when the share was created (see setting #2 in share settings above), this section houses all attachments included with the record. If multiple fields and or types of attachments are available, tabs and bubbles for each attachment field and type to allow navigation to the various attachments. Also, if there are multiple similar attachments, arrows on either side of the attachment will allow the user to navigate from one attachment to the next.
- Related records: Any fields with multiple related records will appear in the related records section.
- Open in new tab: If attachments were included (see setting #2 in the share settings above), this option allows any attachment available to be launched into its own browser tab for full-screen viewing.
- Copy link: If attachments were included (see setting #2 in the share settings above), this option allows the share recipient to grab a copy of the link to the attachment. This link can be shared with anyone. When clicked it, will provide a full-page expanded view of the shared attachment file.
- Download: If attachments were included (see setting #2 in the share settings above), this option allows the user to download the attachment file.
- Collaboration: If either share settings 4 or 5 listed above are enabled when creating the share, this tab will be present. Setting 4 will allow the share recipient to view collaboration that has happened among users about the record. Setting 5 will allow the share recipient to add their own comments. If the share recipient is an authorized user who is signed in, their comments will be associated with their profile. If the share recipient is not signed in, any comments they provided will be attributed to the anonymous user.
- Next and Previous links: These links will let the share recipient navigate from record to record vs. having to navigate back to the list to select the next record. Next and previous options are both typically displayed. When on the first or last record, only the next and previous options appear, respectively.
- Layout: The details page can have a horizontal or vertical split layout. The layout shown is vertical. Click the layout icons to switch between vertical and horizontal layouts if desired.
- Filter panel - Add criteria: Use the add criteria button to select the field(s) to filter the share records list.
- Operator set: Different operator sets are available for each filter field type. For example, if filtering on a text field, the options will be: contains, equal to, not equal to, starts with, is null, and is not null. . Click the operator word shown to see a dropdown of options available for the field. Choose a different option if desired.
- Criteria: Enter the criteria to be applied when filtering the field.
- Remove field: To exclude a field from the criteria, click the X to remove the filter field.
- Clear all filters: Click this option to remove all fields and filters in use.
- Apply search filter: With the filters set as desired, click this button to apply the filter criteria.
- Hide panel when done: When finished working with the filter criteria panel, click this to close it.
Deactivating and re-activating share links
If a share link should no longer be used, you disable the link so that it no longer works. Share recipients who click on disabled links will rea