All about sending text messages using GraceBlocks
When text messaging is enabled inside of GraceBlocks, any tab can be designed to include text messaging. (Text messaging is available for a tab when the messaging thread field type is added to the tab.) When this occurs, there are several ways to access the message thread to review and send texts. Review this article to learn about the options and capabilities for sending and receiving messages. Topics include:
- Viewing text messages
- Sending text messages (including selecting templates, adding attachments, and scheduling)
- Filtering records by text messages
To learn about messaging pricing, click here.
To learn how to enable text messaging, click here.
Viewing text messages
You can view messages in a variety of ways inside of GraceBlocks. The following is true for all messages.
| Detail | Visual |
|
When a message recipient replies to a message, the response feeds into the message thread stream in real time. |
 |
|
You can move the cursor over the message to see who sent or scheduled it and the time of delivery. |
 |
|
Messages with a solid outline have been sent already. |
 |
|
Messages with a dotted outline are scheduled and can still be canceled by clicking the red X icon. |
 |
Important notes:
🔔 Message threads are always a view of all messages between a single GraceBlocks number and a receiving number. Even if messages span multiple Blocks or tabs within a Zone, the message thread display is a shared view of exchanges between these two numbers.
🔔If an individual record's phone number has changed over time, a toggle is available for switching between all current and prior conversations, one number at a time, within the message thread view.
Users can view messages in either the spreadsheet view (which they can access in two ways) or the messaging view. Both views give access to the same message body thread.
Option 1: From Spreadsheet view Message cell

Click the Message cell for the record of interest. The Message modal appears, displaying the message thread for the selected record.
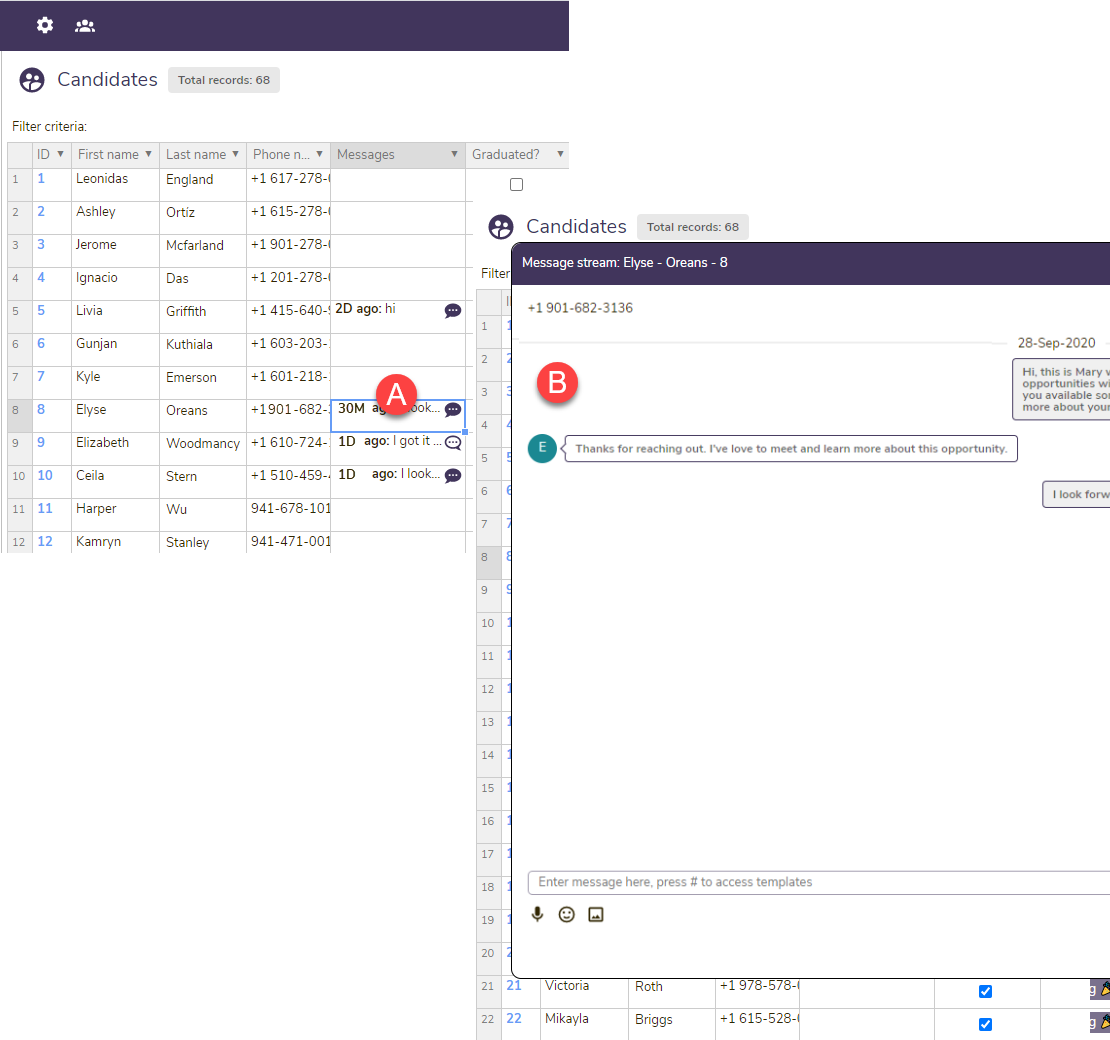
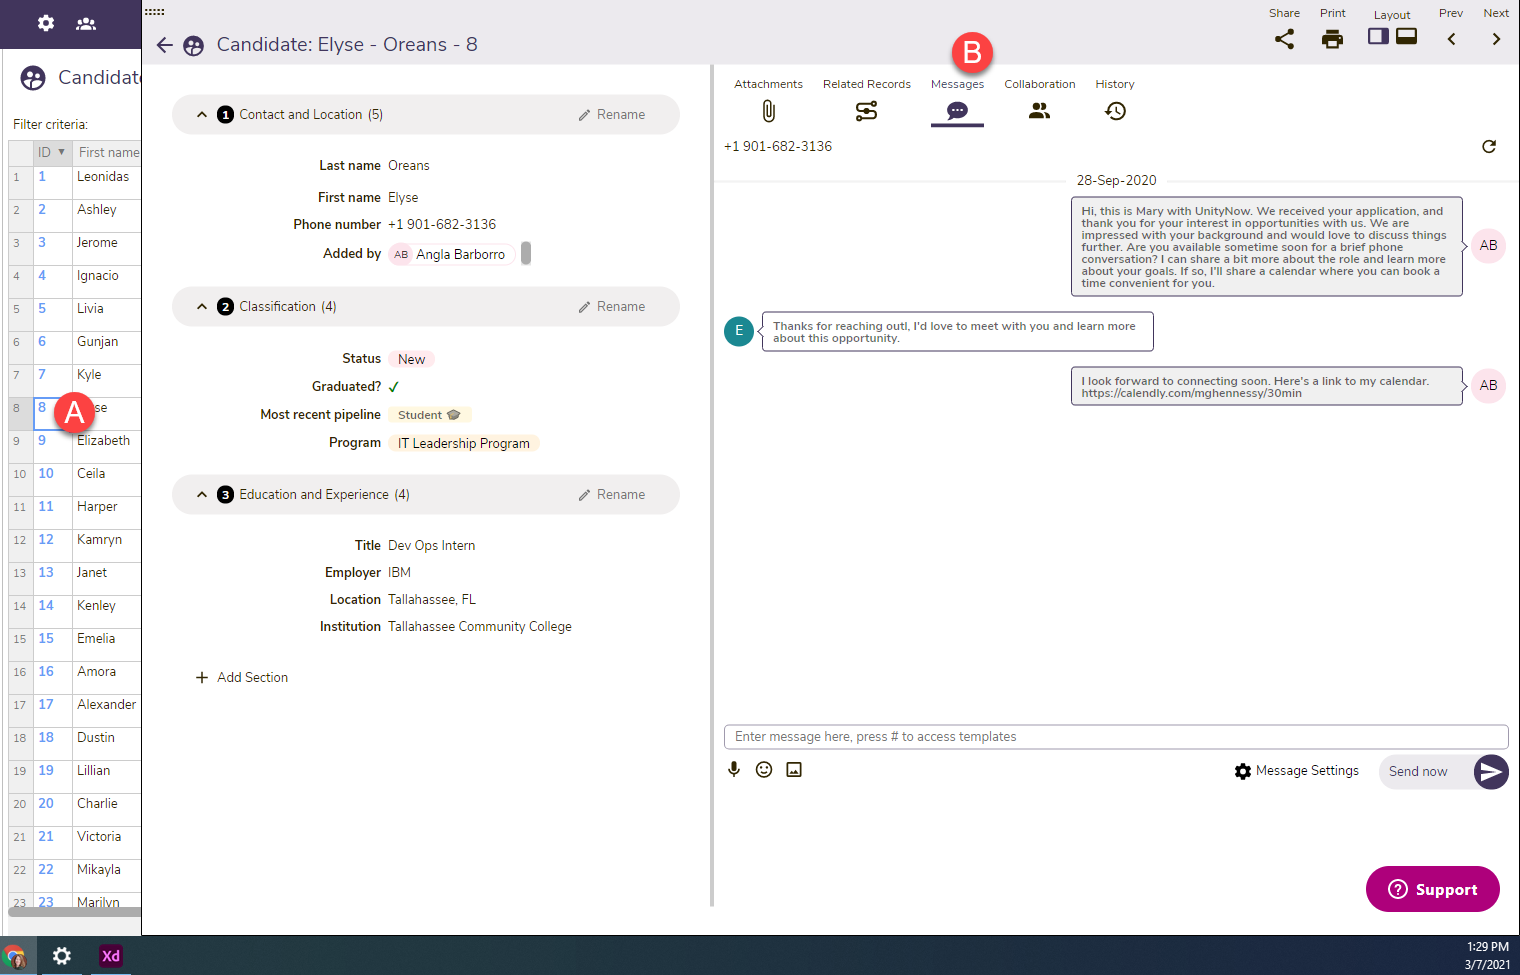
Option 2: From Spreadsheet view details cell
A. Click the details icon (first column # or icon) for the record of interest
B. Click the messages tab in the right panel. The message pane appears for the record.
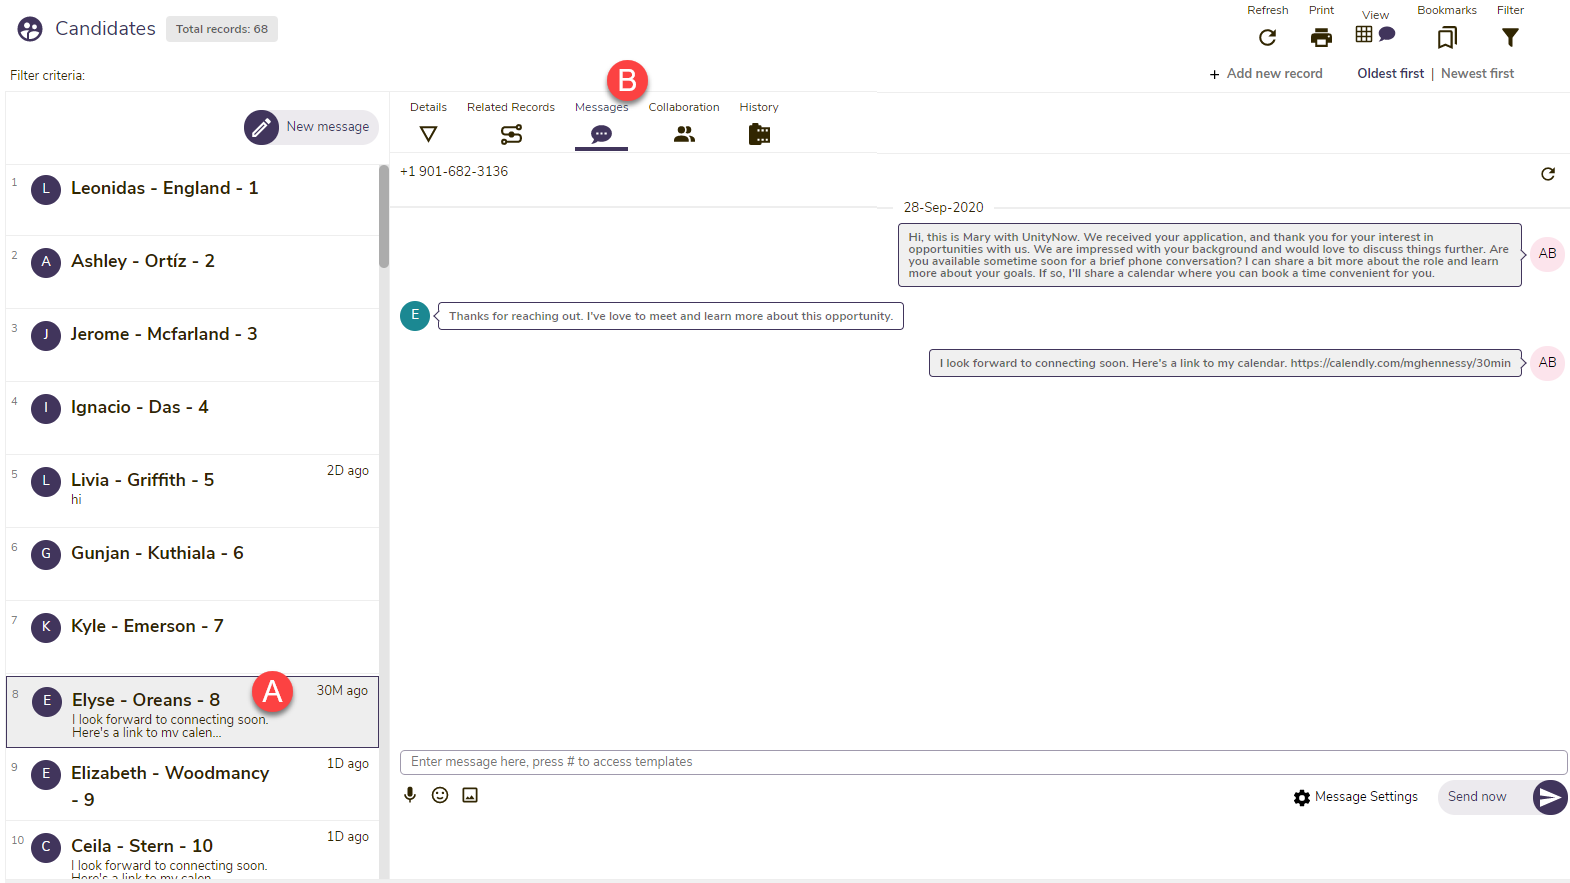
Option 3: From Messaging view

A. Click the record of interest
B. Click the Messages tab in the right pane. The message pane appears for the record.
Sending text messages
You can send text messages to one individual at a time, or to multiple individuals at once. When multiple messages are sent at once, each message is sent separately to each specified individual from you. It is not a group message that goes to all recipients at once.
To send messages to one individual, follow the steps below.
| Step | Action | Visual |
| 1 | With the message view displayed, enter the text of your message into the message box at the bottom of the screen. |  |
| 2 | Enter # while typing your message to access and select any templates that have been configured for use. Use the Height icon to expand and preview the message template text, if needed. The selected template's text populates, and you can review and edit this text prior to sending the message. |  |
| 3 |
Use the speaker, emoji, or image icons to supplement your message. You can attach images by loading them from your desktop or by embedding a URL.
|
|
| 4 |
The Send button indicates when the message will be sent. In the example image to the right, where the button reads Send now, the message will be sent right away if a user clicks it.
To change the delivery timing, click Message Settings, to the left of the Send button. |
 |
| 5 |
In the Message Settings box, toggle on the Message delay option, and choose the timing delay value (number) and increment (Minutes, Hours, or Days). The values you specify here will apply to future messages that you send from this message thread/tab until you change them. Click Save when you have set the time and increment you want to use. |
 |
| 6 |
The message Send button updates to show the timing delay you specified for the message. Click the Send button to send the message. |
 |
| 7 |
I a message is scheduled, it appears with a dotted outline and a red X that you can click to cancel sending the message. |
|
| 8 |
Messages that have already been sent have a solid outline. |
|
 = Dictation
  = Emojis: click to access and insert emojis.
 = Attachments: Move the cursor over the icon, and choose to add images or other attachments.
Important note:
🔔To conserve attachment space in the Zone, load frequently used attachments into an attachment field, and then copy the resulting URL for sharing in messages. Move the cursor over the Attachment icon to access the ability to upload files.

Searching and filtering records by text messages
There are many ways to find individuals, based on how you interact with them while exchanging messages. For example, you might want to see only records for which you are awaiting a reply, or messages that still need a reply from you. You can also filter by the timeframe when a message was sent or received. And you can search for messages that contain or exclude certain text. Follow the steps below to learn how to effectively filter records, based on your message exchanges.
| Step | Action | Visual |
| 1 | From the tab in which you have records that include messages, click the Filter icon in the right toolbar. The filter records modal appears. | 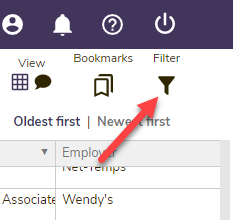 |
| 2 | From the modal, click Add criteria + and choose the fields by which you'd like to filter your records. Make sure to click the + for the column header that corresponds to your message thread. In this example, the name of the field column is Messages. The fields you select display as search filter options inside the modal. | 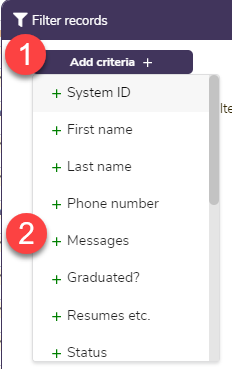 |
| 3 |
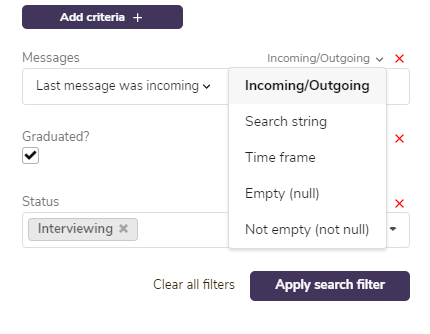
For the Messages field column, choose the type of filter you want to apply, and select your criteria. In this example, Incoming/Outgoing has been selected. This option lets you choose to see messages where the last message was either incoming or outgoing. Reference the table below for all possible operator types for this field and the options that they support. |
 |
| 4 |
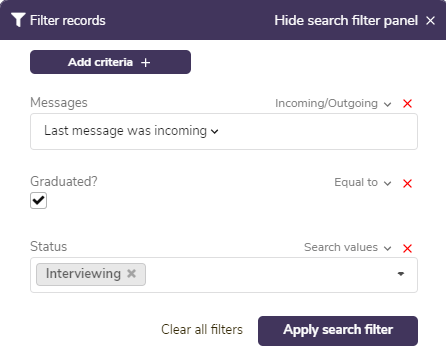
Enter any additional criteria into other filter fields that will help you find the records you want to work with. Then, click Apply search filter. The records are filtered according to the criteria specified. |
 |
| 5 |
Add, remove, or change the filter criteria as desired, and repeat until you are working with the desired record-set. Then, click the Hide search filter panel. The filter panel closes, with the criteria applied. |
 |
| 6 |
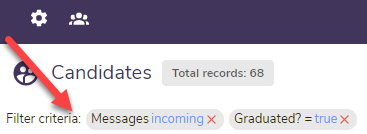
Filter criteria that are applied show as filter bubbles on the top left of the main page area. You can remove individual criteria options by clicking the label. Or, you can repeat the steps above to completely change your filter criteria options. |
 |
The table below describes all possible message operators and how they work to help you filter your records.
| Message thread operator type | Description |
| Incoming/Outcoming |
Two options appear when this operator is selected: Last message was incoming: Select this to see messages where you have not provided a response. Last message was outgoing: Select this to see all messages where you were the last to reply and have not received a response. |
| Search string | Use this to search the message body for contents that contain the keywords you specify. |
| Time frame |
Find messages sent or received within a specific time frame. Options include: Last 24 hours Last 48 hours Last 73 hours Last 7 days Last 14 days Last 30 days Last 90 days Last 180 days Last 360 days This quarter Last quarter This and last quarter Year to date Last year |
| Empty | Find records where there has been no message activity at all. |
| Not empty | Find records where there has been at least one message sent or received. |