Sending email and text messages in bulk
When using GraceBlocks native email or text messaging feature, is is recommended to work in Messaging View, it is possible to send emails (up to 200) and text messages (up to 100) in bulk. When sending messages in bulk, they are delivered individually and tracked individually for each recipient; this is not a group texting feature. This article covers:
Steps to send text messages in bulk
Steps to send email (and preview) messages in bulk
Steps to send text messages in bulk
Provided the messaging field type is in use in the tab, users can follow the steps outlined below to send text messages in bulk.
| Step | Action | Visual |
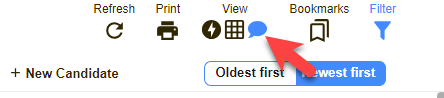
| 1 |
Click the Chat icon in the View section of the actions toolbar. Messaging view appears. |
|
| 2 |
Use the Filter feature to identify the records you are interested in sending a message to. Make sure your record set is filtered at least most of the way to your desired recipients before continuing to the next step. |
 |
| 3 |
Click the select check boxes for the records that you'd like to include as email recipients. |
 |
| 3 |
Click the COMPOSE Text button just above the list of possible recipients. The Compose new text message modal appears. |
 |
| 4 |
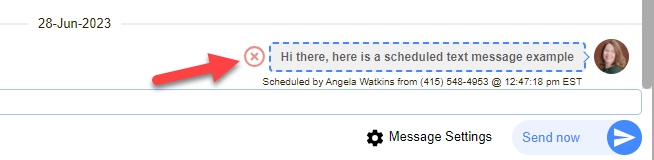
1. Hover to see the selected recipients. 2. Optional - if you need to alter the recipient's list, click Cancel to start over with the correct records selected. 3. Type your message. 4. Select your message delivery settings (if you wish to change the delivery timing of the message, options include 1) immediate (by toggling off Message delay) or by a toggled on Message delay number of 2) minutes 3) hours 4) days). 5. Click the Send Now button.
Your message will be scheduled for delivery or sent immediately depending on the timing set in message settings. |
 |
Steps to send email messages in bulk
Provided the email field type has the Enable email messages setting toggled to the active position, users can follow the steps outlined below to send email messages in bulk.
| Step | Action | Visual |
| 1 |
Click the Chat icon in the View section of the actions toolbar. Messaging view appears. |
|
| 2 |
Use the Filter feature to identify the records you are interested in sending a message to. Make sure your record set is filtered at least most of the way to your desired recipients before continuing to the next step. |
|
| 3 |
Click the select check boxes for the records that you'd like to include as email recipients. |
|
| 3 |
Click the COMPOSE Email button just above the list of possible recipients. The Compose new email message modal appears. |
 |
| 4 |
1. From the left panel, choose an email template if any are configured. This option only appears if templates exist for this tab. This will repopulate the rest of this page for you and allow you to continue your work from the working draft provided. Learn more about email templates. 2. The from email will be pre-selected based on how your from email is configured for the tab. Also if a CC or BCC should be included click these links and line will appear for entering these email addresses. Learn more about managing the email from address. 3. A count of your selected recipients will appear. Hover on the # recipients to review and confirm the full list of recipients. (Click Cancel in the top right to reselect the correct recipients and start again if necessary.) (To understand your options for To - see the important notes below.)
4. The from name for your message will appear here. It will be the sender's name by default. 5. The reply to address will populate by default with the email address that routes message replies back into graceblocks. Users who reply to the email they receive will have messages routed to the address specified here. 6. Enter the subject for your message. 7. Enter the message body. 8. Select any message attachments that should be included. Users will be able to select from any attachment file that is located in your zone that you are authorized to access. 9. Configure message delay settings if desired to delay the timing of your message. 11. Click the Send button.
Your message will be scheduled for delivery or sent immediately depending on the timing set in message settings. |
|


 (if needed)


Important notes:
🔔 Messages will be sent individually to each recipient.
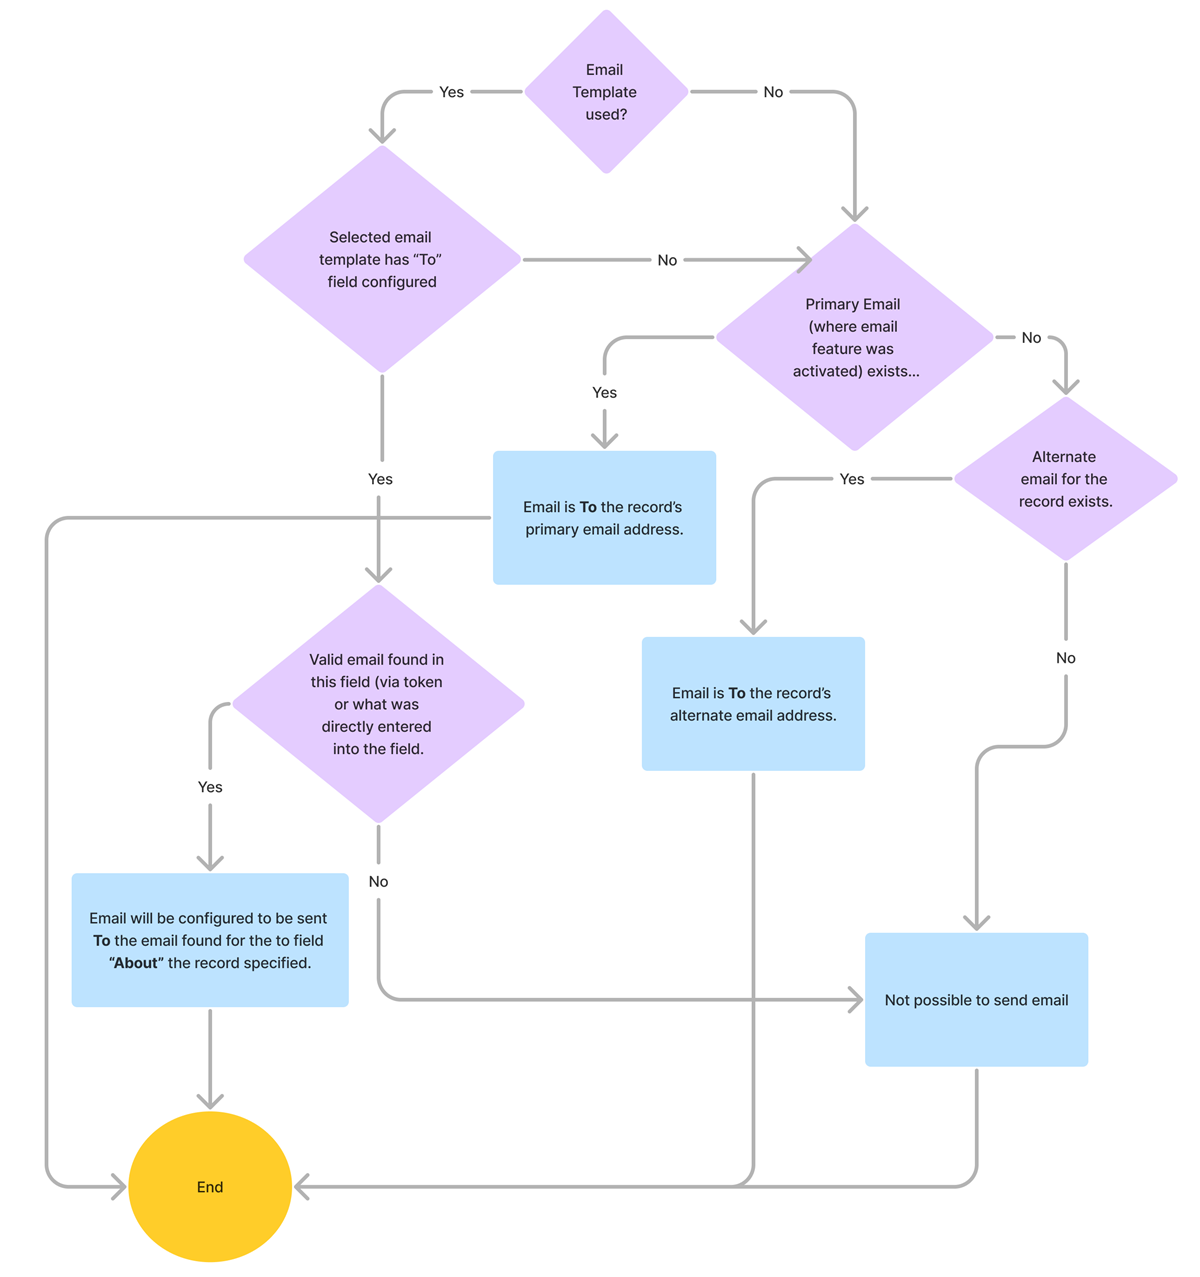
🔔 The message will be sent "to" the email address identified via the following rules evaluation:
🔔 Messages (both email and text) that are scheduled may be canceled by clicking the cancel icon just to the left of the scheduled message in the recipient's messaging timeline. These messages must be canceled one at a time for each recipient included in the message from the recipient's dedicated messaging timeline.