Zone creation and navigation elements
When you first enter GraceBlocks, you land on the GraceBlocks Homepage. On the Homepage, you can access one or possibly more Zones. A Zone is the workspace unit where groups of Blocks are built and managed by a team of licensed users inside the GraceBlocks platform. Each Zone operates on its own prescribed plan, as defined by the Zone owner. The owner of the Zone is ultimately responsible for which users can access the Zone, as well as the content residing in the Blocks of that Zone.
This article covers three topics:
Zone business logic
- The Zone owner determines the plan and the users who are licensed to access the Zone.
- A user's account can belong to multiple Zones. A single account has a Zone user license for each Zone with which they are associated, which is governed, administered, and paid for (if on a paid plan) by the Zone owner.
- GraceBlocks is designed for easy connection of data inside a single Zone, but not across Zones. For this reason, it is very easy to connect data across Tabs and Blocks that reside inside the same Zone using the Relational field type. However, it is not possible to connect data from two different Zones in this manner.
- Data is secure and bespoke to the Zone where it is created. Regardless of your role, it is not possible to simply copy or move a Block from one Zone to another.
How to create a Zone
Any user who is above the age of 18 and has a validated mobile phone number is able to create new Zones. If you create your account yourself (rather than being invited by a Zone Owner), you must validate your phone number and create your first Zone while you create your GraceBlocks account. If you are invited into a Zone by a Zone Owner, you need to go to My profile to supply and validate your mobile phone number to activate Zone creation capabilities.
If you create a Zone, by default you are the Owner of that Zone. To learn more about managing users and roles inside a zone, see Managing Zone users.
Once you are authorized, creating a zone is easy: click + Add Zone (#7 in the following illustration), and give the Zone a name.
Zone features and navigation elements:
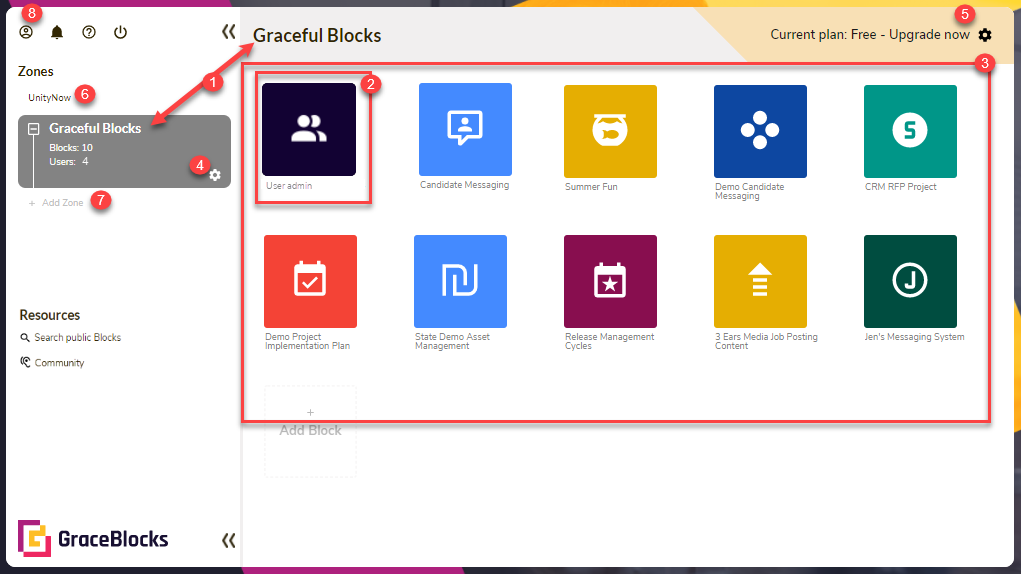
This illustration identifies the elements involved in creating and navigating a Zone:
#1: Selected Zone: In this case, the selected Zone is called "Graceful Blocks." A user can look at the Blocks for one Zone at a time. The selected Zone is highlighted in Gray in the left navigation bar and is represented as the header in the main section of the page.
#2: Zone user management: "User admin" is an automatically created and special Block that exists for each Zone, and it cannot be deleted. Zone Owners can invite users to their Zone by adding them to this Block. To learn more, read about Managing Zone users.
#3: Zone Blocks: The Blocks for the selected Zone are shown on the page for the user. When an authorized user for the Zone logs in, they can see only the Blocks to which they have been granted access. To learn more, read about Managing Block users.
#4: Zone settings: Only Zone Owners can control the settings for a Zone. Under Zone Settings, users can control the name and messaging phone numbers associated with the Zone. Zone deactivation can also be managed here. To learn more, read about: Managing Zone settings.
#5: Zone plan: The capabilities offered in a Zone are controlled by the selected plan. Various pricing tiers are available, including a free plan option. Only Zone Owners can see this gear icon, which they can click to modify the plan for the Zone. To learn more, read about: GraceBlocks plans.
#6: Additional Zones (not selected): If you belong to more than one Zone, any that are not currently selected appear as text in the Zones list. Click the Zone name to select that Zone. Only the selected Zone's Blocks display in the main section of the page.
🔔 Important Note: In a single browser session on your device, you can only be inside one Zone at a time for the system be operate correctly. When navigating to a Zone, it is important to close any browser tabs representing any other Zone that may be open on your device.
#7: Add zone: If you are over 18 years of age and have a valid phone number associated with your account, you will see the option to add a new zone. Click + Add Zone and supply a name to create your new Zone. A user is the Zone Owner for any Zone they create. Once a new Zone exists, click it to load it and begin creating Blocks. To learn more, read about Introduction to Blocks.
#8: My Profile: My Profile contains information about your account. If you have not yet validated your phone number because you created your account by being invited by another user to their Zone, you can validate your mobile phone number under My Profile. You must complete this step to see the option to add a new zone (#7 above). You can also update other basic information associated with your profile, such as your name and password, and take other actions in this area. To learn more, read about Managing My Profile.