Introduction to Zones
A Zone is the workspace unit inside the GraceBlocks platform where groups of Blocks are built and managed by a team. Each Zone has its own prescribed plan, as defined by the Zone owner.
This introduction covers the following topics:
- Zone rules
- Account-creation implications for adding Zones
- Zone actions: view Zone Blocks and add Zone
- Zone user management
Zone rules
- A user can belong to multiple Zones.
- From the GraceBlocks homepage, you can choose the Zone you want to view, and the Blocks for that Zone display.
- GraceBlocks is designed for easy connection of data inside a single Zone, but not across Zones:
- It is very easy to connect data across Tabs and Blocks that reside inside the same Zone, using the Relational field type. It is not possible to connect data from two different Zones in this manner.
- Data is secure and bespoke to the Zone where it is created. For that reason, you cannot simply copy or move a Block from one Zone to another, regardless of your role.
Account-creation implications for adding Zones
There are two ways to create a GraceBlocks account, and the method you use to create your account affects your ability to create Zones:
- Create an account from scratch. In this case, you create your first Zone when you create your account, and you are an Owner of that Zone. As a Zone Owner, you can manage the users who are invited to access your Zone. You are required to provide and validate your mobile phone number to create an account from scratch.
- Create an account using one or more links that were sent to your email address to invite you into existing Zones by the Zone's Owners. If you create your account this way, you are not required to provide or validate a mobile phone number, and you become a user of the Zones where you have been invited to collaborate. If you have created your account this way and also want to create a Zone where you are the Owner, you must first select My Profile and validate your mobile phone number. You can then create your own Zone from scratch.
Zone actions: View Zone Blocks and Add Zone
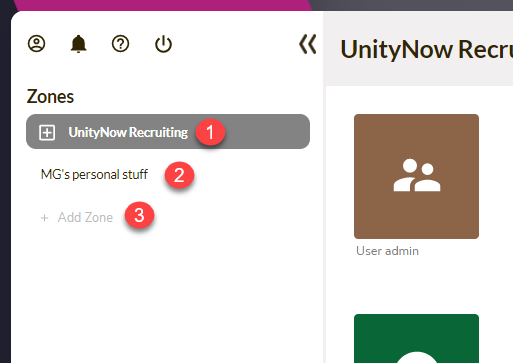
You can view Zone Blocks and add Zones from the left panel of the GraceBlocks homepage:
- To view the Blocks of a specific Zone, select that Zone in the Zones section.
- To add a new Zone, you must have a validated mobile phone number under My profile and must be at least 18 years of age. Provided that you meet those requirements, you can click Add Zone, enter a name for the Zone, and press Enter.

| # | Description |
| 1 | Selected Zone: the user is authorized, and this Zone is currently selected. This Zone's Blocks are displayed. |
| 2 | Unselected Zone: the user is authorized, but the Zone is not currently selected. This Zone's Blocks are not displayed. Click an unselected Zone to select that Zone and display its Blocks. |
| 3 |
+ Add Zone: Click + Add Zone to add a new Zone. (If you do not see this option, you do not have a validated phone number on file. To make this option appear, go to My profile and validate your phone number.) |
Zone user management
GraceBlocks users with active accounts can belong to one or more Zones. Users are associated with Zones through a special Block that exists for each Zone: Users for <Zone name>. Unlike all other Blocks in a Zone, the Users Block cannot be deleted, and its style and information cannot be modified. Only users with the role of Zone Owner can see this Block. Use it to manage the users who have access to the Zone. To learn more, see Managing Zone users.