Invoice history and delivery and notices
As a Zone owner, once you have signed up for a GraceBlocks plan, you will begin receiving invoices on a scheduled basis (either monthly or annually, based on your selection). You will also receive invoices for any messaging-related purchases. Payments are processed with the primary payment method you specified for the Zone. This article explains how to view invoices within GraceBlocks, as well as how to manage email delivery of invoices.
Accessing invoice history
Users with the role of Zone owner can view and manage the invoices. Every invoice that has been processed by GraceBlocks for a specific Zone is available under invoice history. You can access them as follows:
| Step | Action | Visual |
| 1 |
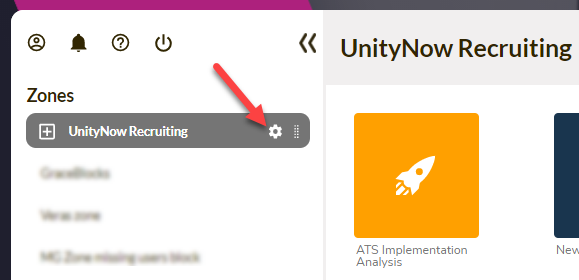
Click the Zone name in the left panel of the GraceBlocks homepage, and then click the Settings icon (shaped like a gear) to access Zone settings. The Zone settings page displays. |
|
| 2 |
Navigate to the Invoice delivery section, and click View invoice history at the far right on the header bar of the Invoice delivery section. The Invoice history page displays. |
|
| 3 |
For each invoice, you can view the following on this page:
|
|
| 4 |
Click the invoice icon for the corresponding row to view a specific invoice. |


Managing invoice information notice delivery
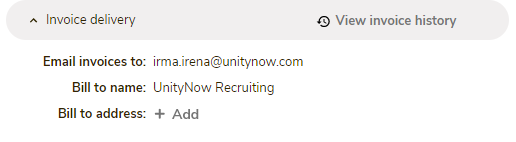
By default, invoice notices (successes and or failures) are emailed to the initial Zone owner who created the Zone. Invoices are billed to this email address and to the name that matches the Zone name at initial creation. You can edit this information and can add a physical address to future invoices, if desired. Changes you make will apply to future invoice contents and any associated delivery notices. Follow these steps to make any desired updates to this information:
| Step | Action | Visual |
| 1 |
Click the desired Zone name in the left panel of the GraceBlocks homepage, and then click the Settings icon (shaped like a gear) to access Zone settings. The Zone settings page displays. |
|
| 2 | Navigate to the Invoice delivery section. Review the information, and decide if changes are needed. | |
| 3 |
Click on the Email Invoices to, or Bill to name fields to update the information that is currently specified. Click out of the field after you make your updates, and the changes will be automatically saved. |
|
| 4 |
Click + Add to add a billing address to the Zone, or (if an address has already been provided), click 🖊 Change to change it. |
|
| 5 |
Enter billing address information, and click Save. |