Web form settings
Web forms allow builders to create on-brand web experiences that can support the collection of new records inside GraceBlocks. You might use them to collect requests for help, job applications, project tasks, feedback surveys, or new inventory items. This article describes the available web form settings. This article covers:
Editing web form settings
| Step | Action | Visual |
| 1 |
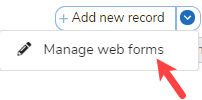
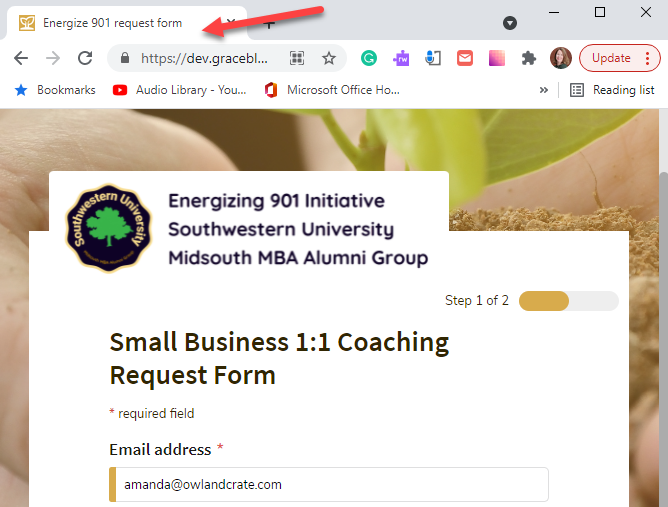
From any tab, move the cursor over + Add new record, and choose the dropdown option. Then select Manage web forms. The web forms modal appears. |
 |
| 2 |
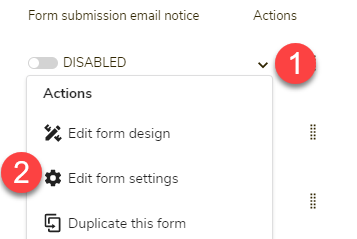
For an existing web form, click the Actions dropdown menu, and select Edit form settings. 🔔If no web forms exist yet, you need to create a web form before you can manage its settings. For instructions, see managing web forms.) The web form settings modal appears. |
 |
| 3 |
Make adjustments to the web form settings, and then click one of the following: a. Save - to save any changes and keep working on the page.
b. Save & go to designer - to save any changes, and switch to the form designer. (To learn more, see managing web forms.)
c. Save and close - to save changes and return to the web forms list modal.
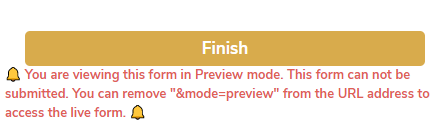
d. Preview form - to preview the web form. This action launches the form in a new tab, showing you the most up-to-date saved version of the form. 🔔 The preview form is not the live form. It cannot be submitted to create records inside GraceBlocks. |
a. b. c. d. The form in preview mode has this note at the bottom of each page to ensure that users understand that it cannot be submitted: |


Understanding web form settings
Use the table below to learn what each web form setting controls and about the web form's behavior.
| Setting | Description | Visual |
| Form name |
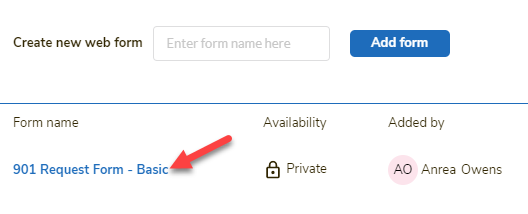
This setting controls the name of the form as it appears in the managing web forms modal that displays the list of web forms created by builders. |
 |
| Form page title |
This setting controls the name of the form as it appears when the form is in use.
🔔 The favicon of the form, which accompanies this title, is always the accent color of the form (see below) and the icon for the tab, as configured in GraceBlocks. |
 |
| Outer Form Width |
This number controls the width of the full form canvas. The pixels on the screen outside this width will be shaded at 10% opacity of the form's accent color. |
 |
| Inner form width (px) |
This number controls the inner width width of the main content of the form, where the core content appears including fields and RTF text. If you are displaying a lot of content on the form in addition to fields, make this width wider to accomidate the layout. |
|
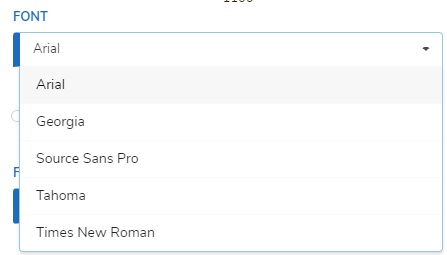
| Font |
This setting controls the font of the labels and all text on the form. The visual to the right shows the available options. |
 |
| Show labels in all caps |
This setting controls where the labels of the form appear in all capital letters, as shown in the top example to the right. If you want all of the labels of the form to display in all capitals, toggle on this option. |
 |
| Font size |
This setting controls the size of the text on the form. |
Options and their impact on label font size: Small (11pt font) Medium (14pt font) Large (17pt font) |
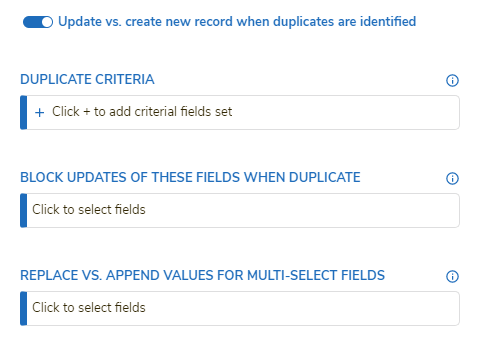
| Update vs. create new record when duplicates are identified |
This setting activates duplicate detection and management for the form. Once you toggle on this option, three more settings appear to allow you to configure duplicate management settings. All of these settings are interconnected. Read and set the options carefully to implement this capability correctly. To learn how to manage duplicate logic through your web form, see web form duplicate logic. |
|
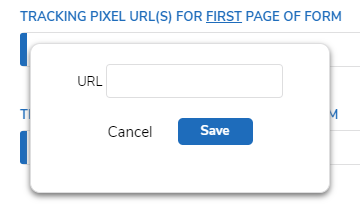
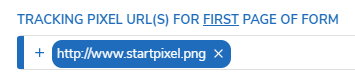
| Tracking pixel for the first page of the form |
This setting controls whether the first page of the form includes a tracking pixel. If you are using a tracking system that needs to be pinged every time someone starts the form, enter the URL of tracking pixels here, one at a time, by clicking the + icon for each. You must enter a valid URL for the tracking pixel to work. When rendering the pixel on the form, GraceBlocks embeds the URL as an image tag that is pinged when the page loads. Here is an example of what to enter: |
1. Click +.
2. Enter the URL, and click Save.
The tracking URL appears.
3. Repeat steps 1 and 2 to add multiple pixel URLs. |
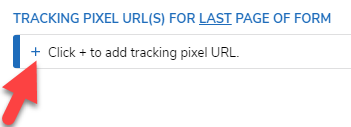
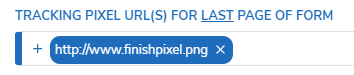
| Tracking pixel for the last page of the form |
This setting controls whether the last page of the form includes a tracking pixel. If you are using a tracking system that needs to be pinged every time someone finishes the form, enter the URL of the tracking pixels here, one at a time, by clicking + icon for each. You must enter a valid URL for the tracking pixel to work. When rendering the pixel on the form, GraceBlocks embeds the URL as an image tag that is pinged when the page loads. Here is an example of what to enter: |
1. Click +.
2. Enter the URL, and click Save.
The tracking URL appears.
3. Repeat steps 1 and 2 to add multiple pixel URLs. |
| Accent and button color |
This setting controls the color branding on the form field buttons and image color area (background). Choose the color that best reflects your brand. All forms start with a GraceBlocks default purple color of hex #41355c. In the visual to the right, the color has been set to #D8AB4C. If no image is loaded in the designer, this solid color would appear in its place. If you are on a paid plan, you can enter any hex value. If you are using a free plan, you can select from the color options provided. |
|
| Include progress bar |
This setting controls whether the progress bar appears on forms that have at least one page break. Toggle on this setting to get the progress bar to appear on forms that display more than one page. |
|
| Include print option |
Individuals who are looking at a web form will have the option to print the page using a print icon which will appear in the top right corner of the web form. The print icon will print the specific page of the web form where the print icon is clicked. |
|
| Auto-reload form after 5 seconds upon successful form completion |
This setting controls whether the web form reloads the first page after 5 seconds of displaying the thank you page. Toggle on this setting to reload the web form after the 5-second delay. By default, this setting is not on. Users will need to close the window when they are finished reading the completion page message. This setting is beneficial when you are using a form for a kiosk type of situation where multiple users will complete the form in turn. |
|
| Max size in MB for attachments |
This setting defines the maximum total size of all of the attachments that can be submitted with the form. If there are multiple attachment fields, GraceBlocks sums the total size of the attachments across the fields to identify when the maximum limit has been reached. By default, the limit is 5 MB. |
|
| Social share form title |
This setting controls the title that appears if you generate a social sharing image for your form. To learn more, see the social share image feature. |
|
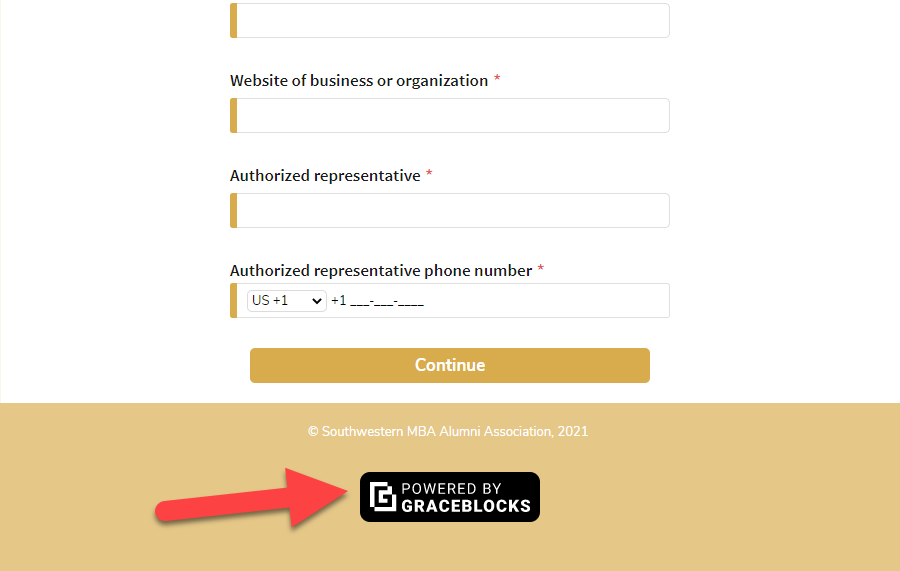
| Include powered by GraceBlocks logo in the footer |
This setting controls whether the powered by GraceBlocks logo appears in the footer of the form. If you are on a paid plan, you can choose to disable the powered by GraceBlocks logo. If this setting is toggled on, it appears in the footer of the form and in the social sharing image generated. When this setting is toggled off, the logo is removed from both places. |
|
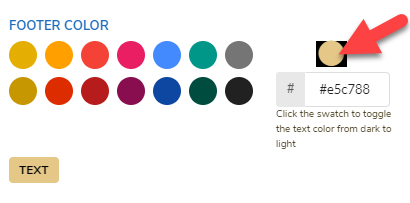
| Footer color |
Provided that the footer is configured to display, this setting controls the color of the footer portion of every page of the web form (from start page to thank you page). All forms start with a light gray footer color of hex #F9F9F9. If you are on a paid plan, you can enter any hex value. If you are using a free plan, you can select from the color options provided. If you want black or white text for the footer, click the dot above the hex color (shown by the arrow on the right). |
|
| Footer text |
This setting controls the text that displays in the footer section of the web form. Text that you enter for this setting appears in the footer section of the web form. The text appears centered on every page in the web form (from the start page to thank you page). You can toggle the color of the footer text to be either black or white. Do this by clicking the selected footer color, it will have either a black or white background illustrating the selected text color. (This is shown where the arrow is pointing in the footer color image to the right with black text selected). |


🔔 The footer section of the form appears only when footer text or the GraceBlocks logo is configured to display.