Building workflows
The Workflow Manager is a powerful automation tool within GraceBlocks that enables users to automate various tasks, such as sending emails, text messages, updating records, and triggering conditional actions. With a user-friendly interface and extensive customization options, builders can define workflows tailored to their operational needs. This article covers:
Adding new / Modifying existing workflows
Builders can complete the steps below to add or modify a new workflow.
| Step | Action | Visual | ||||||||||||||||
| 1 |
From any Block, click the Manager workflows icon (triple arrows) in the top left bar. The workflow manager appears in a new tab. |
 |
||||||||||||||||
| 2 |
Enter a form name, and click Create new workflow. The workflow editor launches with the initial trigger editor open. |
 |
||||||||||||||||
| 3 |
Workflow TriggersComplete the trigger definition form and click Save. Once the trigger is saved, the system will display trigger condition options, defining when the workflow should execute. A trigger consists of: Event Location – The Block and Tab where the system monitors for the event. |
 |
||||||||||||||||
| 3a |
|
|||||||||||||||||
| 4 |
Specify the additional conditions where this workflow should occur. This will allow you to limit which records will cause the workflow to be triggered. Conditions consists of: |
 |
||||||||||||||||
| 5 |
Click Save to Save the workflow trigger. The workflow trigger node appears on the workflow canvas designer. (Note the number in the top next to the name of the workflow, this is the ID of the workflow, 90 in this case.) |
|
||||||||||||||||
| 6 |
Click on the blue square below the trigger link and drag down and release. This will allow you to define the first of many actions which can occur in this workflow. The first action node (blue box) for the workflow will appear on the canvas. (Note the number in the bottom left cornder of the Action, this id of this action and will be associated in history to any event that occurs on a record based on this action, 2 in this case).
|
 |
||||||||||||||||
| 7 |
Double Click the blue action box representing this action node. The editor for this node will appear. |
Run condition reference image
Choosing the Source for Action Conditions |
||||||||||||||||
| 8 |
Workflow actionsComplete the action definition form and click Save when done. An action consists of: Action name – The name of the action as it will appear in the canvas designer.
Occurrence: If the same record can trigger a workflow to run more than once, this setting will determine if it will fire on subsequent triggers or not. For example, let's say the workflow is supposed to trigger an email and you do not want the email to be sent to the same individual more than one time and it's triggered every time a person completes a specific web form. If the same person fills out the same form multiple times, and dupe check logic identifies and dupe stacks onto the existing record, you might want to set the workflow to only Run once so it's only the first time that form is submitted for the individual. Choose Run once if the workflow should only ever run one time. Choose run always if the workflow should run every time it is triggered regardless if that record has already triggered this same workflow in the past. Choose Limit repeats to no more than once per _____ where you will specify the number and duration (eg 7 days, 2 hours) during which the workflow will not refire for the same record. Action details - This section appears after event selection and varies based on your selection. This section defines in detail the action to be taken. Action conditions - Add any filters to limit which records this action should be applied to. For every preceeding event in the workflow, you will have a dropdown list of available events and can then add filters related to that event occuring to limit the action event from occuring. You will first specify the Source: You can select to apply filter criteria from the original trigger or prior workflow action in the path to this action. The value must exist upon completion of that trigger or action for it be able to be applied and the criteria must also still be met at runtime for the action (in the case of delayed actions). This criteria definition works using the same filtering logic defined for filtering records. Timing - This allows you to control when the action will occur. By default it will happen as soon as the event is triggered. However, you can control the timing of the event based on the triggering date, or any other date field availabe to the workflow based on any date field associated with preceeding events of the workflow. When a date field is used, you can specify the action to occur either before or after the specific date linked to the field on the associated action event. For example let's say a request is for a specific deliverable date. A reminder email and text might be sent to the owner of the request the day prior reminding them of the pending due date. And, a follow-up message might be set as a separate automated email/text action for the recipient of the request the day after it was due thanking them for their collaboration and support. |
|||||||||||||||||
| 9 |
Repeate steps 7 and 8 until all actions have been added to your workflow. |
|||||||||||||||||
| 10 |
Should any actions need to be deleted, double click them, scroll to the bottoom and click Delete forever. Then confirm you want to complete this action by following the prompt instructions. The action will be removed from the permanently deleted and removed from the workflow canvas. |
 |
||||||||||||||||
| 11 |
While working, click Save to save any changes and continue working on your the workflow definition. When finished configuring the workflow, click the workflow name and back arrow to return to the workflow list. The workflow manager list of workflows appears. |
 |
||||||||||||||||
| 12 |
Activation/Testing/DeactivationBy default, newly saved workflows are not active. You will want to validate your workflow immediatly after activating it to ensure it is running properly. When you are ready to validate your workflow, toggle it on to activate it. |
|
||||||||||||||||
| 13 |
Take actions in GraceBlocks that should trigger each scenario of your workflow definition. Validate expected behavior. This step is critical. Document what is and is not working and review and tweak the workflow until you are getting the expected results. |
|||||||||||||||||
| 14 |
If results ae not expected and you need to pause testing, deactivate the workflow and only reactivate it when you are ready to resume testing. |
|||||||||||||||||


Understanding workflow management options
From the workflow manager main page each workflow listed has an Actions button which. Take the following steps to access workflow options:
| Step | Action | Visual |
| 1 |
From any Block, click the Manager workflows icon (triple arrows) in the top left bar. The workflow manager appears in a new tab. Only workflows where all triggers and actions in the workflow are affiliated with Blocks where a user has Builder access are available. |
|
| 2 |
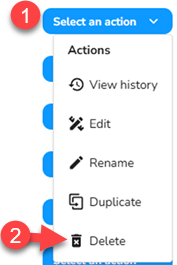
Filter to find the workflow of interest, then choose the Select and actions dropdown to select an action. The action selector appears. |
 |
Workflow Action: Viewing history
Each workflow retains a history of all actions taken within the last 90 days. After this time period, the history is no longer available. You can access this information through the 'View history' action. Follow these steps to effectively review and navigate workflow history. The visual and accompanying table below outlines how to interpret and use all of the elements of the history page for a workflow.

| ID | Item | Description |
| 1 |
Workflow name and Unique Identifier |
The top of the page displays the name of the workflow being viewed, along with its unique identifier. |
| 2 |
Actions toggle |
This setting is enabled by default. When active, the history table includes a row for each workflow action. If a workflow has 10 actions, a single workflow trigger ID may be linked to multiple actions (listed as events in this table). Toggle off to only see one row in the history table per triggered workflow. Toggling off will also hide columns reference above as 11, 12 and 14 - 17. |
| 3 |
Filter option |
Use this to filter workflow option to filter the information in the table using any identifiers and terms visible in the history grid. |
| 4 |
Refresh |
Use this option if you have active workflows running and you want to ensure you have the latest information visible on the page. |
| 5 |
ID |
Whenever a workflow trigger initiates and at least one action is completed, a unique identifier affiliated with this workflow instance is generated. This ID is displayed in this column. |
| 6 |
Instance status |
For each workflow id , this column denotes the status of that instance of the workflow. A given instance is can have the status of either running, complete or failed. |
| 7 |
Trigger date |
The date and time when the workflow instance was triggered. |
| 8 |
Block and Tab |
These columns identify the Block and tab location of the triggering record which initiated the workflow instance. |
| 9 |
Triggering event |
This is the trigger event defined for the workflow. |
| 10 |
Action ID |
This is the identifier associated with the action in the workflow. When editing a workflow's design, this ID is on the lower left hand corner of the action tile.
|
| 11 |
Action name |
The name of the action as defined in the workflow. |
| 12 |
Action status |
The status of the action. A given action is can have the status of either running, scheduled, or missing requirements. |
| 13 |
Trigger record |
The specific record which triggered the workflow. |
|
Action Block |
The Block where the action is associated. |
|
|
Action tab |
The tab where the action is associated. |
|
|
Action record |
The specific record affiliated with the action (click to view details).
In the case of email messages, in white text in the footer of the email, you can find this same identifier to help you trace any workflow based emails and what caused them to be sent. |
|
|
Action date |
The date and time when the action occurred, provided the action is completed. |


Workflow Action: Editing an existing workflow
To edit an existing workflow, complete the following steps below.
| Step | Action | Visual |
| 1 |
From any Block, click the Manager workflows icon (triple arrows) in the top left bar. The workflow manager appears in a new tab. |
|
| 2 |
Find the workflow you wish to edit and select Edit from the Select an action dropdown. The workflow editor launches. |
 |
| 3 |
Double click the trigger or action which you would like to modify. The editor for the selected trigger or action will appear in the right panel. |
 |
| 4 |
Modify the action as desired and when done click Save. Not all attributes of a trigger or action are editable. If something is grayed out, it is not possible to edit this attribute. Instead, a new workflow should be created. |
 |
| 5 |
Repeat steps 3 and 4 until all actions are modified as desired. |
|
| 6 |
To change connectors between actions, double click the line (the line will be removed) and then redraw the connector that is desired. (Click, drag and then double click to where you want it connected.) Note: Sometimes, depending on the change to the connection, it may be necessary to rebuild the workflow step that is moved into a new position if the positioning has changed data that is allowed to feed into the action. It is important to thoroughtly test when changing connectors and confirm the results are behaving according to what is desired. If the behavior is not aligned, delete the action and rebuild it. |
 |
| 7 |
If any actions need to be deleted, double click the action, scroll to the bottom of the action modal and click Delete forever. Then follow the prompts. Once confirmed, the action will be deleted. |
|
| 8 |
With all edits applied, click Save in the top left of the page to save all of the workflow changes.
|
 |
| 9 |
Click the back arrow/name of the workflow to navigate back to the workflow manager page. |
|
| 10 |
IMPORTANT: TEST YOUR CHANGES and confirm the expected results are as desired. |
Workflow Action: Rename a workflow
To rename a workflow, complete the steps outlined below.
| Step | Action | Visual |
| 1 |
From any Block, click the Manager workflows icon (triple arrows) in the top left bar. The workflow manager appears in a new tab. |
|
| 2 |
Find the workflow you wish to rename select, Rename from the Select an action dropdown. The Name of the worklfow becomes editable. |
 |
| 3 |
Adjust the name of the workflow as desired and click Rename. The new workflow name replaces the old one. |
Workflow Action: Duplicate a workflow
If you need to make major changes to a workflow, it may be best to duplicate the existing workflow. IMPORTANT. MAKE SURE ONLY ONE VERSION of the workflow is active at any given time. Follow the steps below to duplicate a workflow.
| Action | Visual | |
| 1 |
From any Block, click the Manager workflows icon (triple arrows) in the top left bar. The workflow manager appears in a new tab. |
|
| 2 |
Find the workflow you wish to rename select, Duplicate from the Select an action dropdown. The selected workflow will be duplicated using the same name as the origional workflow with the word copy at the end. The newly created workflow will be inactive. |
 |
| 3 |
Proceed to adjust the duplicated workflow as desired. When ready to test, first Deactivate the origional workflow by toggling OFF the active/inactive toggle. |
REMEMBER TO KEEP ONLY ONE WORKFLOW VERSION ACTIVE AT ANY GIVEN TIME. |
Workflow Action: Delete a workflow
If you delete a workflow, it will permanently delete the workflow's configuration and history. Follow the steps below to delete a workflow.
| Step | Action | Visual |
| 1 |
From any Block, click the Manager workflows icon (triple arrows) in the top left bar. The workflow manager appears in a new tab. |
|
| 2 |
Find the workflow you wish to rename select, Delete from the Select an action dropdown. The prompt appears to confirm deletion. |
 |
| 3 |
Read and follow remaining prompts to complete the delete action. |
Important notes about managing workflows
🔔 If you change an actions connection in a workflow (the line that connects it to the other actions or the trigger) it is possible that the action will no longer run properly. It is important to test and confirm the action works correctly if node changes are applied as some changes are incompatible. If testing of the changed action does not work as expected, you should recreate the action manually and delete the now old version of the action.
🔔 When using the formatting content action and crafting email body content for the send message action, it is possible to leverage images that are tokens, but for the images to render correctly, you need to include the following text to the field's callout properties: "rtf image"
🔔 When sending emails that include images, it is imortant that true images are used as send grid our email delivery platform will flag images copy and pasted into an email body. Be sure any images you need to use are loaded as attachments physically somewhere in graceblocks and you are using the either a token reference (see above note) or that you are using the rull long url for the image in the formatting of your content. (Graceblocks long image urls all start with: https://storage.googleapis.com/)
🔔 When configuring frequency of a workflow using the recurring task event trigger you will need to specify the frequency using a cron expression.
Understanding Cron Expressions for speficying workflow scheduling frequency
Common scheduling examples
-
- Every minute:
* * * * * - Every 3 hours:
0 */3 * * * - Every Monday at 9:00 AM:
0 9 * * 1 - Every day at midnight:
0 0 * * * - Every first day of the month at 8:00 AM:
0 8 1 * *
- Every minute:
Cron expressions are made up of five fields (or six if specifying seconds), separated by spaces:
| Field | Allowed Values | Special Characters |
| Minute (0-59) | 0-59 |
, - * / |
| Hour (0-23) | 0-23 |
, - * / |
| Day of Month (1-31) | 1-31 |
, - * / ? L W |
| Month (1-12 or JAN-DEC) | 1-12 or JAN-DEC |
, - * / |
| Day of Week (0-6 or SUN-SAT) | 0-6 or SUN-SAT |
, - * / ? L # |
Special characters explained
-
*→ Any value (e.g.,* * * * *runs every minute),→ List separator (e.g.,0 9,12 * * *runs at 9 AM and 12 PM)-→ Range (e.g.,0 9-17 * * *runs every hour from 9 AM to 5 PM)/→ Step values (e.g.,*/5 * * * *runs every 5 minutes)?→ No specific value (used in Day of Month or Day of Week fields)L→ Last (e.g.,Lin Day of Month means "last day of the month")W→ Weekday closest to a given day (e.g.,15Wruns on the closest weekday to the 15th of the month)#→ "Nth" occurrence (e.g.,2#3in Day of Week means "the 3rd Tuesday of the month")
A detailed case example:
Let's say you want the workflow to run at 8:15am every 3rd Saturday of the month of Feb and June only. Cron has you covered:
15 8 15-21 2,6 6

Breaking it down:
| Field | Value | Meaning |
| Minute | 15 | Runs at minute 15 |
| Hour | 8 | Runs at 8 AM |
| Day of Month | 15-21 | Runs between the 15th and 21st (to capture the 3rd Saturday) |
| Month | 2,6 | Runs only in February and June |
| Day of Week | 6 | Runs only on Saturday |
Why This Works?
-
-
- The third Saturday of any month always falls between the 15th and 21st.
- By specifying
6for Saturday and limiting days to15-21, it ensures it only runs on the 3rd Saturday of February & June.
-